フレクトのクラウドblog re:newal

http://blog.flect.co.jp/cloud/からさらに引っ越しています

Measure the distance with Eye-Tracking on ARKit

研究開発室の馮 志聖(マイク)です。

Introduction

Maybe you know, there are the rumor Apple provide the new device called 'Apple Glass'.

japanese.engadget.com

Such next generation devices are becoming more and more realistic.

With these devices, must we use the finger to touch the screen??

Never. We can use the eyes to point it.

It will become cool thing.

I made an experimental application that uses eye tracking to determine distance.

It could be implemented in Apple Glass.

Fortuitously Apple ios release the ARKit 2.

It can detect the face, eye and tongue.

This time I will use eye tracking.

Let the fantasy thing become the real.

I will use Twilio and ARKit for demo the application.

First I will talk about which technology Apple use for Eye-Tracking.

続きを読む

Amazon Chime SDKとBodyPixでビデオ会議システムにバーチャル背景を実装した話。

こんにちは。研究開発室の岡田です。

前回は、Amazon Chime SDKについてご紹介しました。

cloud.flect.co.jp

今回は、引き続きAmazon Chime SDKに関連して、自分でVirtual背景を作る方法をご紹介します。

Virtual背景とは、背景を他の画像に置き換える機能のことで、主に相手に自分の部屋を見せたくないなーというときに使うものです。 世の中のビデオ会議ソフトでZoomやMS Teamsは Virtual背景をサポートしていますが、Amazon ChimeやAgora.io、Twillioなどでは提供されていないようです。

今回は、なければ作ればいいの精神で、Amazon Chime SDKを用いたビデオ会議システムでVirtual背景を自分で作ってみようと思います。 なお、Twillioでも以下で説明するやり方でできるはずです。ドキュメントを読む限りは。(未検証)

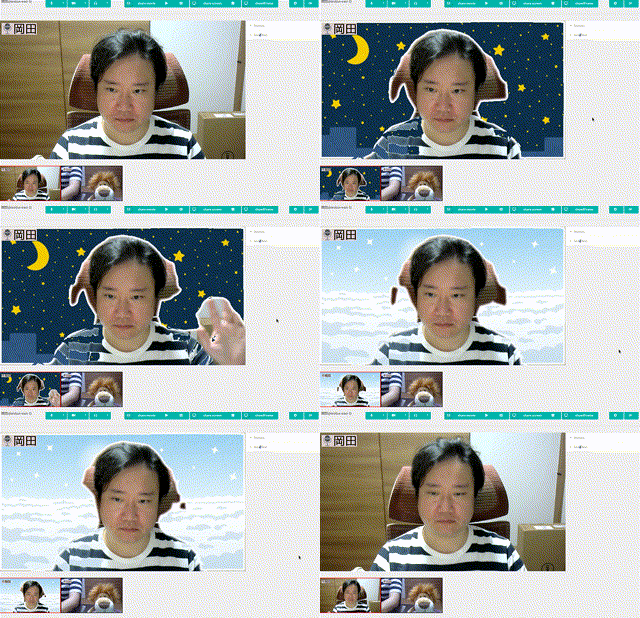
作成したVirtual背景の動きとしては、こんな感じです。

f:id:Wok:20200519183656g:plain

続きを読む

New iPad Pro with LiDAR max distance

技術開発室の馮 志聖(マイク)です。

Introduction

I work in some project and it use New iPad Pro with LiDAR.

I try to find out the LiDAR sensor max distance.

But I can not find out any information about this.

So I try to do some experimental test.

Visual SLAM

ios ARkit is base on this.

It will create a map for AR.

And base on Localization & Mapping.

How Visual SLAM work?

IMU (Inertial Measurement Unit、慣性計測装置) with Camera.

LiDAR SLAM

What is LiDAR (Light Detection and Ranging)?

LiDAR is depth sensor.

It can detect depth data.

How LiDAR SLAM work?

IMU (Inertial Measurement Unit、慣性計測装置) + LiDAR + Camera.

issue

Brightness

For this case I will test it in morning and night.

And use application to detect the value of brightness.

続きを読む

Amazon Chime SDKのデモを動かしてみた件

こちらに Amazon Chime SDK React Component Library を使ってデモを動かした記事も書きました。是非ご覧ください。

こんにちは。研究開発室の岡田です。

前回はマルチバーコードスキャナのご紹介をしました。

cloud.flect.co.jp

今回は、だいぶ話が変わりますが、現在弊社で注目しているAmazonのビデオ会議システム「Amazon Chime」のSDKについてご紹介させてください。

さて、昨今、コロナ禍のためZoomやTeamsといったビデオ会議サービスが注目を集めています。 AWSも数年前からAmazon Chimeというビデオ会議サービスを提供しているのはご存知でしょうか?

aws.amazon.com

Amazon Chimeの特徴については、公式ページやこのページなどに纏められていますので、ここでは詳しく述べませんが、 画面共有や録音など他のビデオ会議サービスでも提供されている一般的な機能はもちろん、電話番号への発信、電話番号への SMS メッセージの送信といったこともできるようです。

我々クラウドインテグレータの視点からすると、AWSが提供しているサービスであること、そしてSDKが提供されているという点で、AWS上に構築したシステムにビデオ会議を統合しやすく、大変便利だと思っています。 弊社でもAmazon Chime SDKを用いたシステムを提案、構築しておりますので、今回は宣伝も兼ねて、Amazon Chime SDKを用いてどのようなことができるのかを、公式のAmazon SDKのデモを動かしてご紹介します。

続きを読む

wasmでマルチバーコードスキャナを高速化した件

こんにちは。研究開発室の岡田です。(所属変わりました。)

前回は、TeamsやZoomで自分をアニメ絵にする方法をご紹介しました。

cloud.flect.co.jp

業務から少し離れていましたがキャッチーな内容なので結構評判が良かったみたいです。 今回は、FLECTの業務に関連する内容をご紹介したいと思います。

FLECTは、ユーザ体験の向上を重視したサービス、プロダクトの提案をさせていただいています。 その中で重要な考え方の一つとして、「特別なソフトウェアをインストールせずに利用できるサービスを提供する」があります。 具体的にはスマートフォンのブラウザ上で動くソフトウェアを開発し、提供することになります。

一方で、一般的に、ブラウザ上で動くソフトウェアはネイティブアプリと比較すると応答性能が劣化する、という問題があります。 応答性能の劣化は直接ユーザ体験にも影響しますので、場合によってはブラウザ上で動かすことによるメリットよりデメリットが勝ってしまうことも考えられます。 このような問題を回避する手段として、ブラウザ上で動くソフトウェアを高速化するWebAssembly(wasm)という技術*1を使うことがあります。

今回は、FLECTが開発しているスマートフォンのブラウザ上で動くマルチバーコードスキャナをwasmを用いて高速化した話をご紹介します。

結果、こんな感じで結構高速で動くようになりました。

f:id:Wok:20200501062054g:plain

*1:仕様と言われたり、言語と言われたりもします。ここが詳しい

続きを読む

GitHubでJacocoのカバレッジレポートを表示するまで(CircleCI+Codecov+gradle)

こんにちは。クラウドインテグレーション事業部の上原です。

研究開発系の先端的な内容が多いFLECTブログですが、
今回は開発の方面から、ちょっとしたTipsを共有してみようと思います。

対象アプリケーション

今回の記事で取り扱うのは、Spring Boot製のバックエンドAPIアプリケーションです。

CIツールにはCircleCIを採用し、GitHubへのpushをトリガーにテスト(JUnit)およびビルド・デプロイを自動実行しています。

circleci.com

「レビューのときにカバレッジが見たい」

CircleCIを導入するにあたり、とりあえず自動テストの実行と、テスト結果をGitHubのプルリクエスト画面に連携する所までを設定。
しかし、コードカバレッジについてはHTMLレポートを出力して保存するタスクを作っただけでした。

.circleci/config.yml

      - run:
          # カバレッジレポートの生成
          name: Generate coverage report
          command: ./gradlew jacocoTestReport
          when: always
      - run:
          # HTMLレポートを移動
          name: Save coverage report
          command: |
            mkdir -p ~/test-results/jacoco/
            find . -type f -regex ".*/build/reports/jacoco/test/.*xml" -exec cp {} ~/test-results/jacoco/ \;
            cp -r ./build/reports/jacoco/test/html ~/test-results/jacoco/html
          when: always
      - store_artifacts:
          # アーティファクトとして保存
          path: ~/test-results/jacoco


f:id:flect-uehara:20200420113416p:plain
実行結果画面のARTIFACTSタグから、レポートを見に行けます

最初はこれで問題なかったのですが、開発が進むにつれ、毎回CircleCIの画面に遷移してレポートを開いて該当部分のカバレッジを探して…というのが手間になってきました。

できればカバレッジもプルリクエスト画面で見えるようにしたいな…欲を言えば、修正分の差分が測定できたり、カバレッジが不十分だったらマージできないようにできたらいいな…
でもそんな都合の良いサービスなんて…………ありました。

CodecovというWebサービスです。

codecov.io

GitHub連携でプルリクエストにカバレッジレポートを表示可。差分測定に対応。UIやグラフも綺麗。いいですね!


f:id:flect-uehara:20200420112248p:plain

利用方法もとても簡単。

  1. Githubアカウントでユーザ登録
  2. Codecovの管理画面からリポジトリを選択GitHub組織の管理者がインテグレーションを許可する必要があります)
  3. アップロードトークンが払い出されるので、設定ファイル(codecov.yml)を作成してトークンを書き込む。(※ 環境変数でも可)
  4. GitHubにpushすると自動でCodecovにカバレッジ情報がアップロードされ、レポートが見えるようになる

あとはCircleCIとCodecovを連携して、自動テストのタイミングでカバレッジを収集するよう設定すればOK!
連携方法は公式のドキュメントとブログに記載されています。

circleci.comGenerating Code Coverage Metrics - CircleCI circleci.comMaking code coverage easy to see with the Codecov CircleCI orb - CircleCI


f:id:flect-uehara:20200420025325p:plain

英語やん…(2020年4月現在)


そう、CodeCovやCircleCIの一部ドキュメントは英語。いろいろ探したのですが、この件に関する日本語の記事は見つかりませんでした。
また、検索の腕が悪いのか「CircleCI+Codecov+Jacoco+gradle」のピンポイントな情報も見つからず…

ということで、英語と格闘して試行錯誤しながら何とか動かせるところまで持っていきました。というのがメインのお話です。

本題(設定ファイル)

結論から言うと、設定ファイルは以下のようになりました。
(注:重要なところだけ抜き出しているので、これだけだと動きません)

build.gradle

apply plugin: 'jacoco'

jacoco {
    toolVersion = '0.8.4'
}

jacocoTestReport {
    reports {
        xml.enabled = true
    }
}

.circleci/config.yaml

orbs:
  codecov: codecov/codecov@1.0.5

jobs:
  run-junit-test:
    steps:
      - (テストの実行などのstep)
      - run:
          # カバレッジレポートの生成
          name: Generate coverage report
          command: ./gradlew jacocoTestReport
          when: always
      - codecov/upload:
          # Orb
          file: ./build/reports/jacoco/test/jacocoTestReport.xml
          when: always

必要な設定は以下の通りです。

  • CircleCIの環境変数に「CODECOV_TOKEN」を追加し、値にアップロードトークンを設定しておく
  • build.gradleの設定で、JaCoCoがXMLレポートを出力するように設定する
  • CircleCIの設定ファイルで、CodeCovのOrb(CircleCIにおけるサードパーティライブラリ的なもの)を読み込ませる
  • CircleCIのstepでレポート出力を実行する
  • CircleCIのstepで、XMLファイルのパスを指定してOrbの「upload」コマンドを実行する

どのファイルをアップロードすればよいのか?認証方法の設定は?など色々ハマったところはあったのですが、まとめるとこんな感じです。
Slackへの通知についても色々調べたのですが、GitHubからの通知に差分等が出てくるようになったので、結局使っていません。

f:id:flect-uehara:20200420111549p:plain
GitHubからのSlack通知に表示されるようになりました

なお、合格とするカバレッジ閾値などは設定ファイルで細かく制御可能です。
細かい設定を追いきれていないので詳しくはCodeCovのドキュメントをご覧ください。

CodeCovのOrbのドキュメントはこちら。

https://circleci.com/orbs/registry/orb/codecov/codecov

おわりに

カバレッジをひと目で確認できるようになり、レビューが格段にやりやすくなりました。開発のスピードや品質を確保するには、仕組み作りが必要不可欠ですね。
CircleCIは機能がとても豊富なので、あとは設定ファイルの例がもっと増えてくれると嬉しいです… (あとOrbの説明ページにも設定ファイルの記述例を…どうか………)

ここからテストの並列実行に取り組んだ話などもあるのですが、それは別の記事でお話できればと思います。 少しでもお役に立てたなら幸いです。それでは!

Semantic Segmentation on AWS SageMaker

技術開発室の馮 志聖(マイク)です。

Introduction

I work in some project and it use Semantic Segmentation on AWS SageMaker.

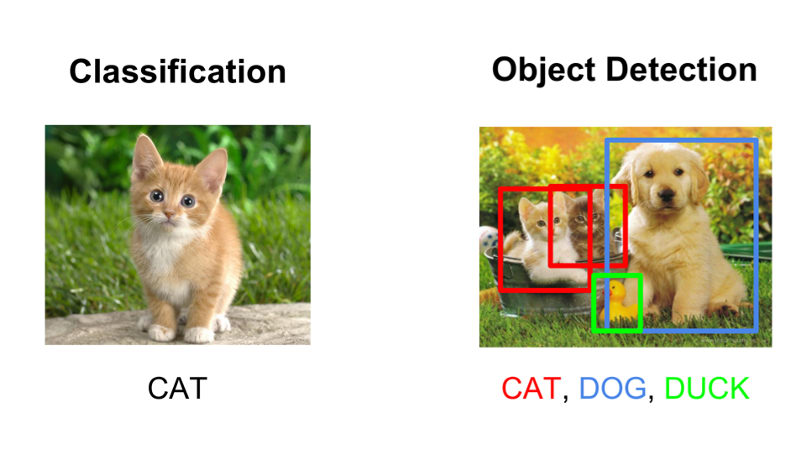
At first we need to know about the popular machine learning method of image classification.

1.Image Classification

This method classify only one and the biggest target of images.

2.Object Detection

This method can find all the possible targets in the images.

f:id:fengchihsheng:20200406125132j:plain
image classification vs object detection

https://www.datacamp.com/community/tutorials/object-detection-guide

3.Semantic Segmentation

This method is upgrade version from image classification. It can detect the area of target.

4.Instance Segmentation

This method is upgrade version from object detection. It can detect the area of all targets in images.

f:id:fengchihsheng:20200403095856p:plain
Semantic Segmentation vs Instance Segmentation
image source : http://cs231n.stanford.edu/slides/2017/cs231n_2017_lecture11.pdf

Why we choose Semantic Segmentation not other method?

Because In this case we need to know about area of target.

Image classification only can classify the images.

Object detection have limitation.

When get the predict result from object detection.

Just only get 4 points of rectangle.

It can not get more detail of object area.

Like this image.

f:id:fengchihsheng:20200406122357j:plain
object detection

Instance Segmentation can identify for each target.

This project only have single class and output area of targets.

And not need to exceed.

So Semantic Segmentation will be better solution.

We only have single class just use Semantic Segmentation is enough.

In this project we only need Classification + Localization.

Task

In this case it have 200 images and resolution is 4K.

Issue

1.Image size is too large to use for training.
2.Detect area is a part of image.

f:id:fengchihsheng:20200406152519j:plain
example detect area

https://www.reporternewspapers.net/2019/08/30/sandy-springs-explores-options-for-street-connectivity-following-residents-concern/

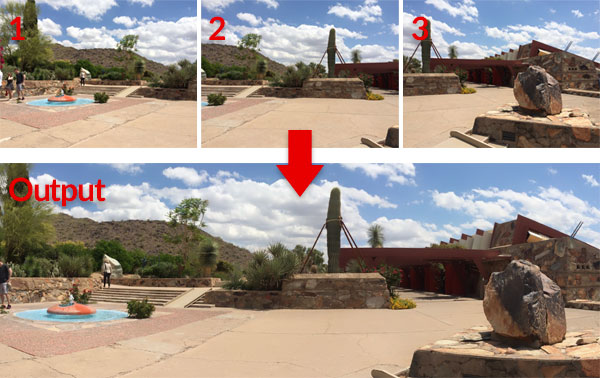
3.Every images is get from video. For each frame distance is too close to cover same target.

For example image stitching have same target.

f:id:fengchihsheng:20200406151658j:plain
image stitching

4.Camera angle and distorted targets.

Like this images.

f:id:fengchihsheng:20200406155013p:plain
camera angle and distorted targets

Solution

Crop image base on 512*512.

Use label object detection way base on human eyes. Focus on special area and throw the empty images.

Split all images to train and validation folder.

Before remove the empty images.

Train images have more than 2000 images.

Validation images have more than 600 images.

After remove the empty images.

Train images have 676 images.

Validation images have 241 images.

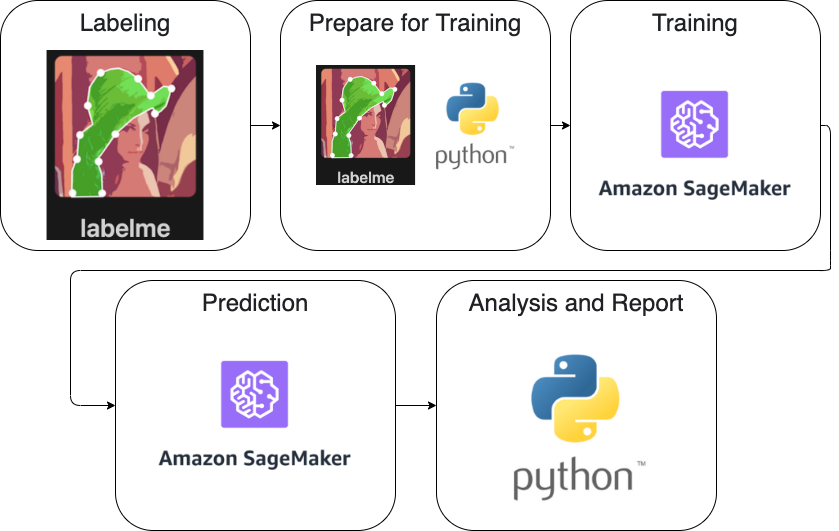
Flow Chart

f:id:fengchihsheng:20200331121256p:plain
flow chart

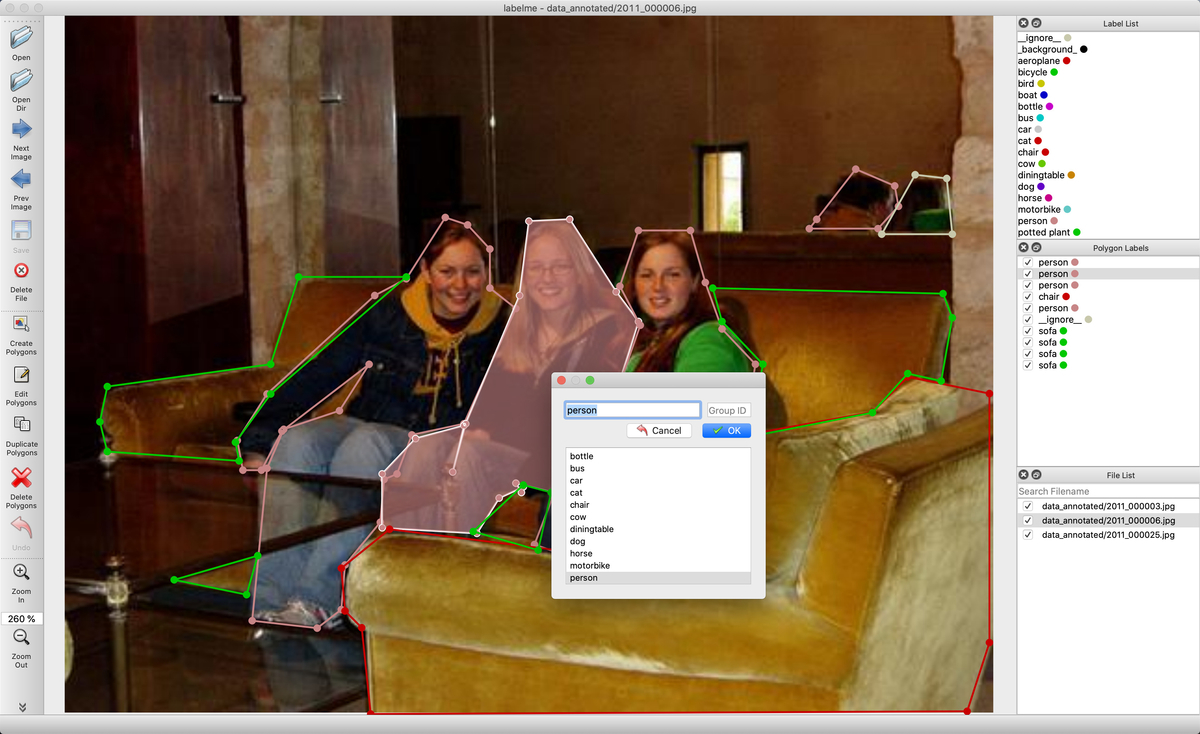
Labeling

https://github.com/wkentaro/labelme

Use labelme to label the images.

f:id:fengchihsheng:20200331172157j:plain
label the data

And after labeling convert data to VOC-format Dataset.

It already have the script for convert.

https://github.com/wkentaro/labelme/tree/master/examples/semantic_segmentation

Prepare for Training

PNG file mode P

In AWS sagemaker only can use Mask file in PNG mode P.

I use python library to convert it.

https://pypi.org/project/Pillow/2.2.2/

Training

Create the new notebook from amazon sagemaker.

And use amazon sample notebook for semantic segmentation pascalvoc.

github.com

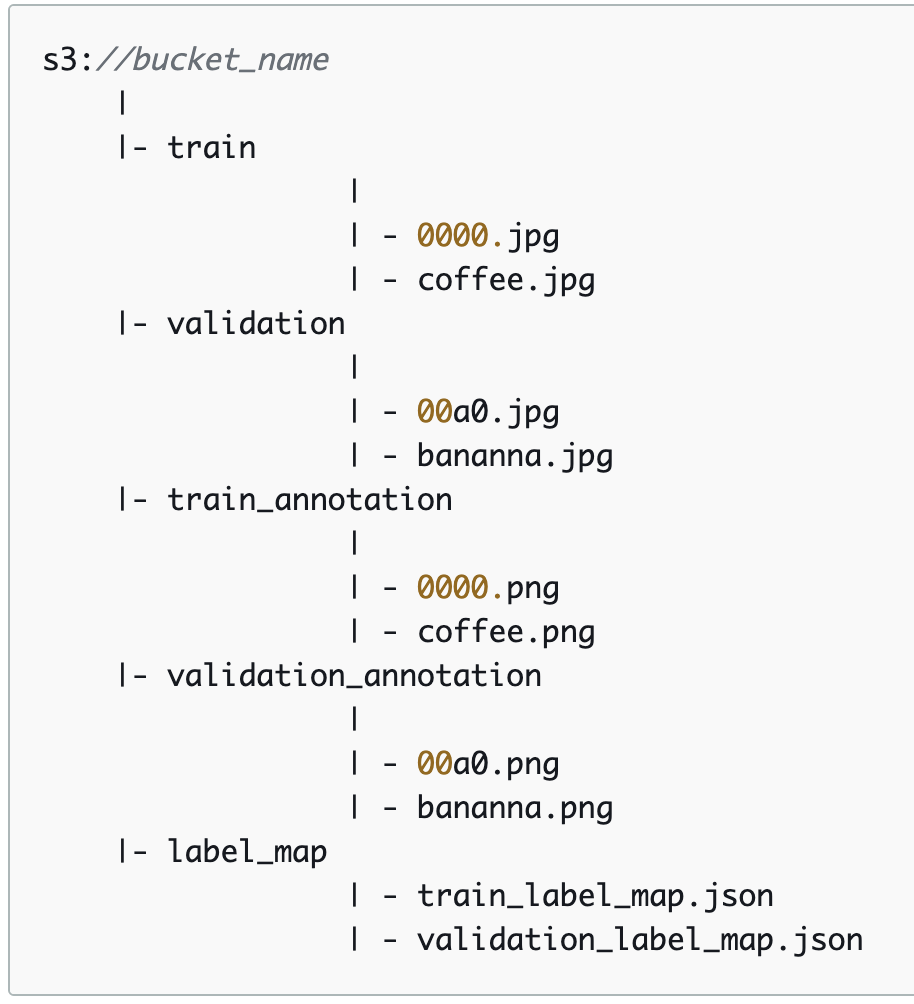
Follow the default folder structure.

f:id:fengchihsheng:20200331132032p:plain
structure

Upload dataset to notebook.

Instance type

Default Amazon SageMaker Notebook instances is ml.t2.medium and 5GB Volume Size.

5GB is not enough for training dataset.

In this case I change 5GB => 1024GB.

And Notebook instances is also slow when trying to prediction or do some other processing.

In this case I change ml.t2.medium => ml.t3.xlarge.

Default amazon sample notebook for semantic segmentation pascalvoc training instances is ml.p3.2xlarge.

When try to training it will have memory issue in this case.

So I change ml.p3.2xlarge => ml.p3.8xlarge.

Amazon SageMaker ML Instance Types :

https://aws.amazon.com/sagemaker/pricing/instance-types/

First Try

We can not use this project images because of NDA.

So I use the sample dataset present.

Use amazon sample notebook for semantic segmentation pascalvoc.

Algorithm : FCN

Backbone : resnet-50

Epoch : 10

Training time

Sample case

This is example training time.

FCN, 10 epochs, renet-50, crop size 240, use 1137 seconds (nearby 21 minutes).

Real case

This is the project training time.

PSP, 160 epochs, renet-50, crop size 512, use 5212 seconds (nearby 1 hour).

FCN, 160 epochs, renet-50, crop size 512, use 4680 seconds (nearby 1 hour).

Deeplab, 160 epochs, renet-50, crop size 512, use 7663 seconds (nearby 1 hour).

Prediction

This is one part after training.

import matplotlib.pyplot as plt
import PIL
from PIL import Image
import numpy as np
import io

im = PIL.Image.open(filename)

ss_predictor.content_type = 'image/jpeg'
ss_predictor.accept = 'image/png'

img = None
with open(str(file_list[i]), 'rb') as image:
    img = image.read()
    img = bytearray(img)
        
return_img = ss_predictor.predict(img)
 
##fix the class number when you use in training.
num_classes = 14
mask = np.array(Image.open(io.BytesIO(return_img)))
img = plt.imshow(mask, vmin=0, vmax=num_classes-1)
img.set_cmap('jet')
plt.axis('off')
plt.savefig(local_output_folder + '/' + basename + '.png', bbox_inches='tight')

After plt.savefig upload to AWS S3 and download to local machine do other process.

Fix the color and size to fit the test images.

Result :

f:id:fengchihsheng:20200331172246p:plain
prediction result

Analysis and Report

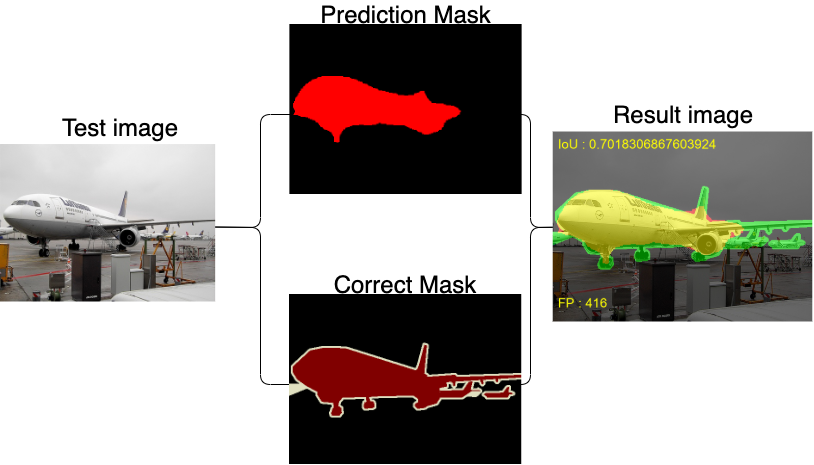
After Prediction I download the result and merge the mask with original test images.

And use IoU and FP for Analysis.

This is for one prediction result.

Color base on light

Green = correct mask

Red = prediction mask

f:id:fengchihsheng:20200331171925p:plain
prediction with correct result

Amazon SageMaker Semantic Segmentation Hyperparameters

All the Hyperparameters you can find in this URL.

https://docs.aws.amazon.com/sagemaker/latest/dg/segmentation-hyperparameters.html

Algorithm

Amazon SageMaker only support FCN, PSP, Deeplab.

Default Algorithm is FCN.

f:id:fengchihsheng:20200403103432p:plain
FCN Structure

image source :

http://cvlab.postech.ac.kr/research/deconvnet/

PSP :

f:id:fengchihsheng:20200403103801j:plain
PSPnet Structure

image source :

https://blog.negativemind.com/2019/03/19/semantic-segmentation-by-pyramid-scene-parsing-network/

https://arxiv.org/abs/1612.01105

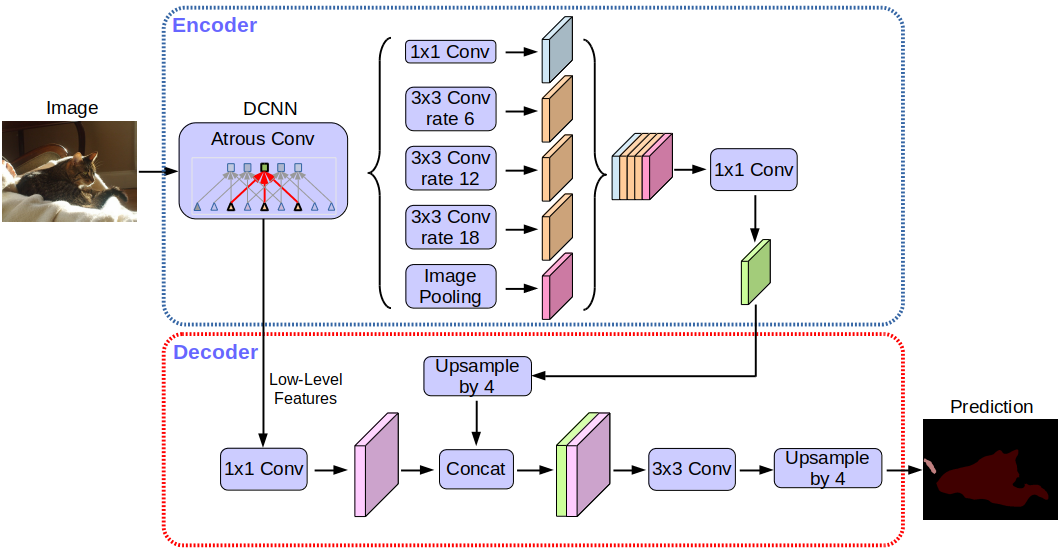
Deeplab :

f:id:fengchihsheng:20200403124445p:plain
Deeplab Structure

image source : https://developers-jp.googleblog.com/2018/04/semantic-image-segmentation-with.html

Backbone

ResNet

What is ResNet?

ResNets solve is the famous known vanishing gradient.

Vanishing Gradient Problem occurs when we try to train a Neural Network model using Gradient based optimization techniques.

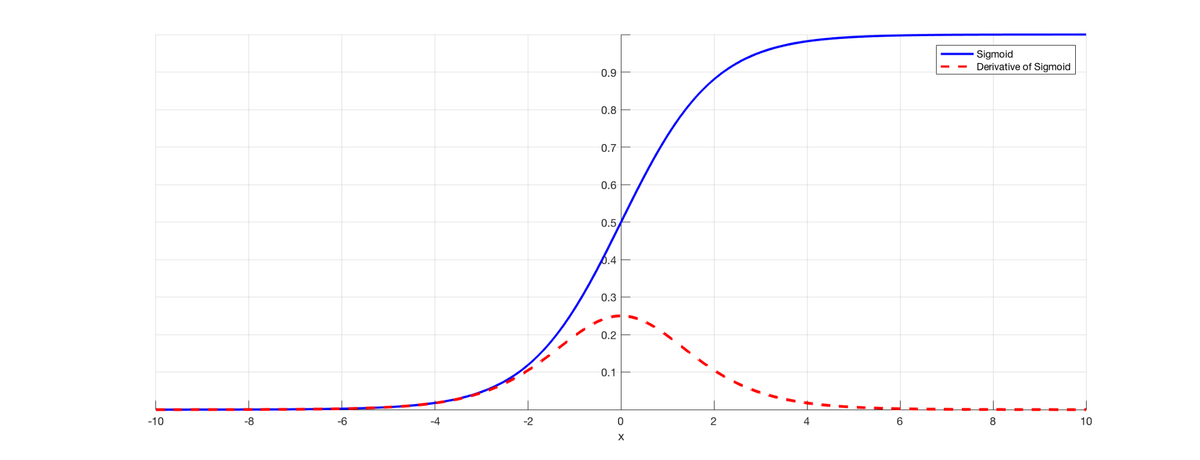
As more layers using certain activation functions are added to neural networks, the gradients of the loss function approaches zero, making the network hard to train.

f:id:fengchihsheng:20200406174334p:plain
Certain activation functions

source : https://isaacchanghau.github.io/img/deeplearning/activationfunction/sigmoid.png

Image is the sigmoid function and its derivative. Note how when the inputs of the sigmoid function becomes larger or smaller (when |x| becomes bigger), the derivative becomes close to zero.

If you want to know more detail please check these page and video.

Vanishing Gradient Problem Reference

https://towardsdatascience.com/the-vanishing-gradient-problem-69bf08b15484

https://medium.com/@anishsingh20/the-vanishing-gradient-problem-48ae7f501257

youtu.be

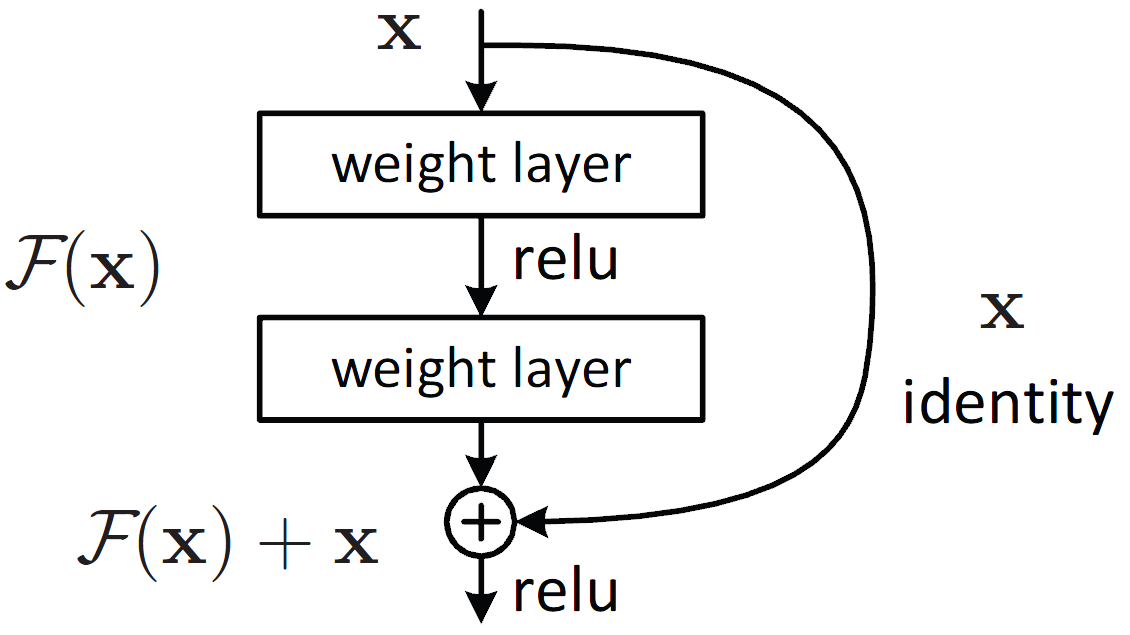
With ResNets, the gradients can flow directly through the skip connections backwards from later layers to initial filters.

If you want to know more detail you can check this page.

ResNet Reference

https://towardsdatascience.com/understanding-and-visualizing-resnets-442284831be8

Amazon SageMaker only support ResNet-50, ResNet-101.

Use ResNet will get short training time and higher accuracy.

Resnet Layer Structure :

f:id:fengchihsheng:20200403110132p:plain
ResNet Structure

image source :

https://neurohive.io/en/popular-networks/resnet/

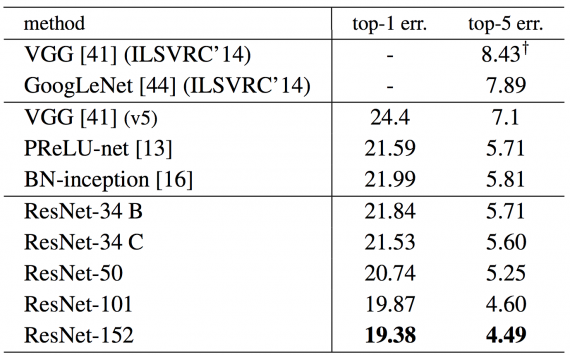
And what is 50 and 101 mean?

It mean 50-layer and 101-layer.

This is error score table. (more smaller is better)

f:id:fengchihsheng:20200406180823p:plain
Error rates (%) of single-model results on the ImageNet validation set

image source :

https://neurohive.io/en/popular-networks/resnet/

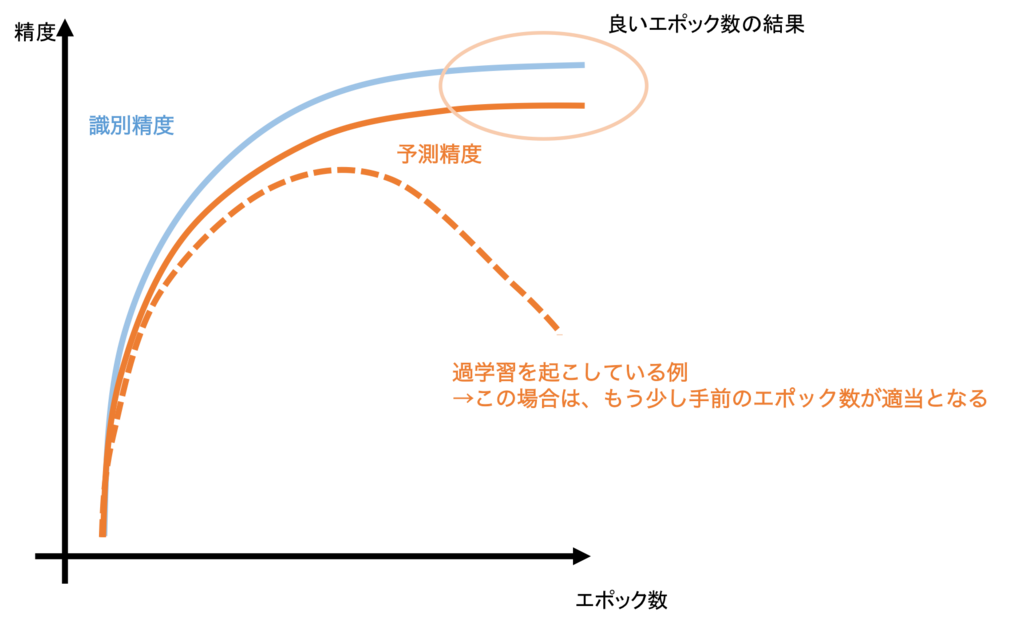
Epoch

f:id:fengchihsheng:20200403120015p:plain
Epoch

image source :

https://www.st-hakky-blog.com/entry/2017/01/17/165137

Final

This is the chance let me learn about semantic segmentation on AWS sagemaker.

And use AWS sagemaker example is faster way to understand how it work.

The result from AWS sagemaker is good for this project.

Reference

labelme
labelme convert to VOC-format Dataset
AWS SageMaker