フレクトのクラウドblog re:newal

http://blog.flect.co.jp/cloud/からさらに引っ越しています

Semantic Segmentation on AWS SageMaker

技術開発室の馮 志聖(マイク)です。

Introduction

I work in some project and it use Semantic Segmentation on AWS SageMaker.

At first we need to know about the popular machine learning method of image classification.

1.Image Classification

This method classify only one and the biggest target of images.

2.Object Detection

This method can find all the possible targets in the images.
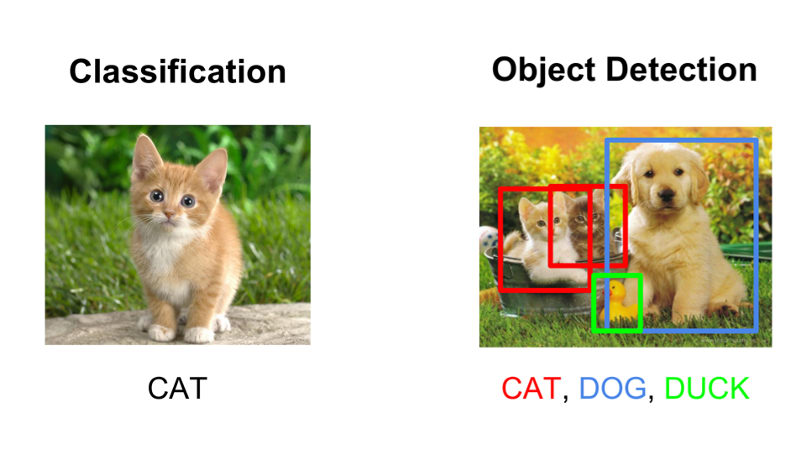
f:id:fengchihsheng:20200406125132j:plain
image classification vs object detection

https://www.datacamp.com/community/tutorials/object-detection-guide

3.Semantic Segmentation

This method is upgrade version from image classification. It can detect the area of target.

4.Instance Segmentation

This method is upgrade version from object detection. It can detect the area of all targets in images.

f:id:fengchihsheng:20200403095856p:plain
Semantic Segmentation vs Instance Segmentation
image source : http://cs231n.stanford.edu/slides/2017/cs231n_2017_lecture11.pdf

Why we choose Semantic Segmentation not other method?

Because In this case we need to know about area of target.

Image classification only can classify the images.

Object detection have limitation.

When get the predict result from object detection.

Just only get 4 points of rectangle.

It can not get more detail of object area.

Like this image.

f:id:fengchihsheng:20200406122357j:plain
object detection

Instance Segmentation can identify for each target.

This project only have single class and output area of targets.

And not need to exceed.

So Semantic Segmentation will be better solution.

We only have single class just use Semantic Segmentation is enough.

In this project we only need Classification + Localization.

Task

In this case it have 200 images and resolution is 4K.

Issue

1.Image size is too large to use for training.
2.Detect area is a part of image.

f:id:fengchihsheng:20200406152519j:plain
example detect area

https://www.reporternewspapers.net/2019/08/30/sandy-springs-explores-options-for-street-connectivity-following-residents-concern/

3.Every images is get from video. For each frame distance is too close to cover same target.

For example image stitching have same target.
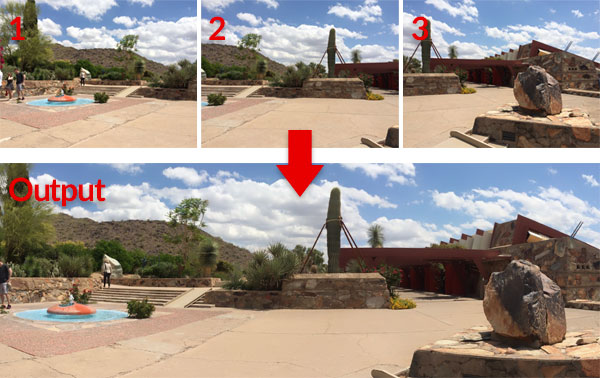
f:id:fengchihsheng:20200406151658j:plain
image stitching

4.Camera angle and distorted targets.

Like this images.

f:id:fengchihsheng:20200406155013p:plain
camera angle and distorted targets

Solution

Crop image base on 512*512.

Use label object detection way base on human eyes. Focus on special area and throw the empty images.

Split all images to train and validation folder.

Before remove the empty images.

Train images have more than 2000 images.

Validation images have more than 600 images.

After remove the empty images.

Train images have 676 images.

Validation images have 241 images.

Flow Chart
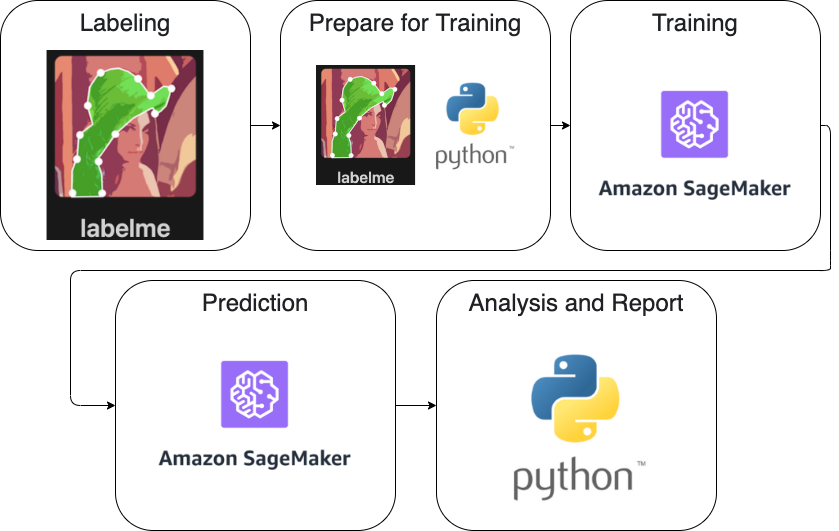
f:id:fengchihsheng:20200331121256p:plain
flow chart

Labeling

https://github.com/wkentaro/labelme

Use labelme to label the images.
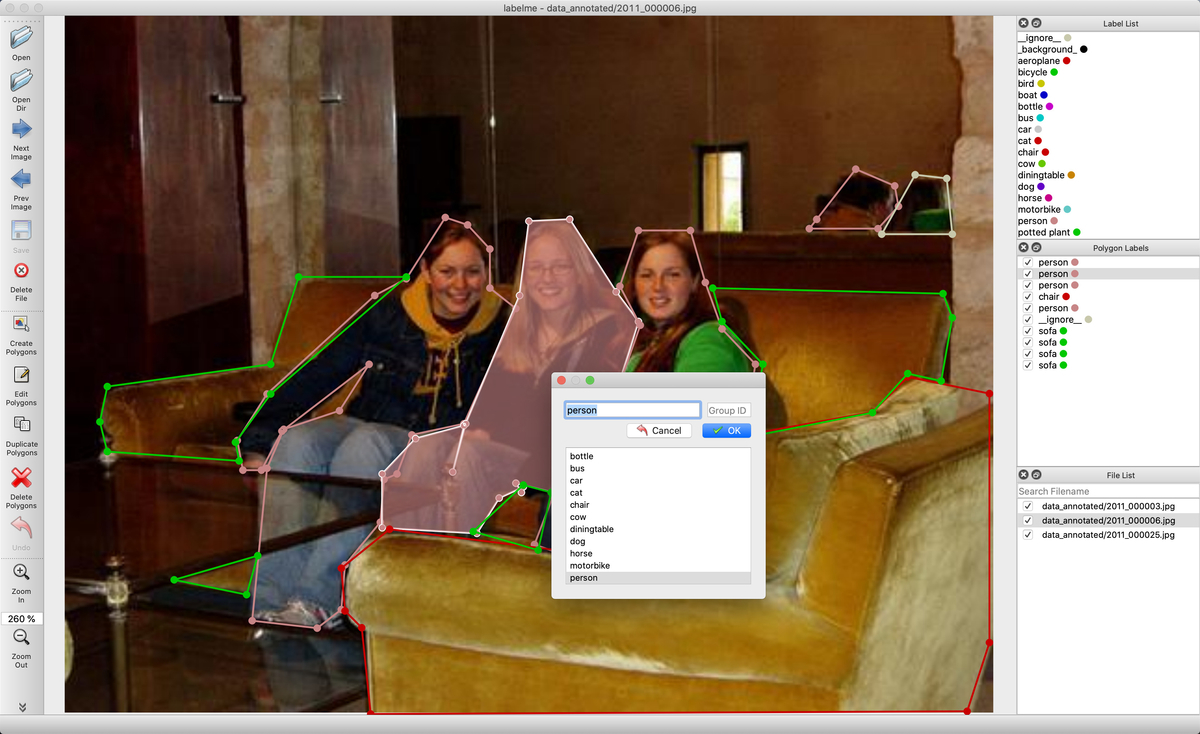
f:id:fengchihsheng:20200331172157j:plain
label the data

And after labeling convert data to VOC-format Dataset.

It already have the script for convert.

https://github.com/wkentaro/labelme/tree/master/examples/semantic_segmentation

Prepare for Training

PNG file mode P

In AWS sagemaker only can use Mask file in PNG mode P.

I use python library to convert it.

https://pypi.org/project/Pillow/2.2.2/

Training

Create the new notebook from amazon sagemaker.

And use amazon sample notebook for semantic segmentation pascalvoc.

github.com

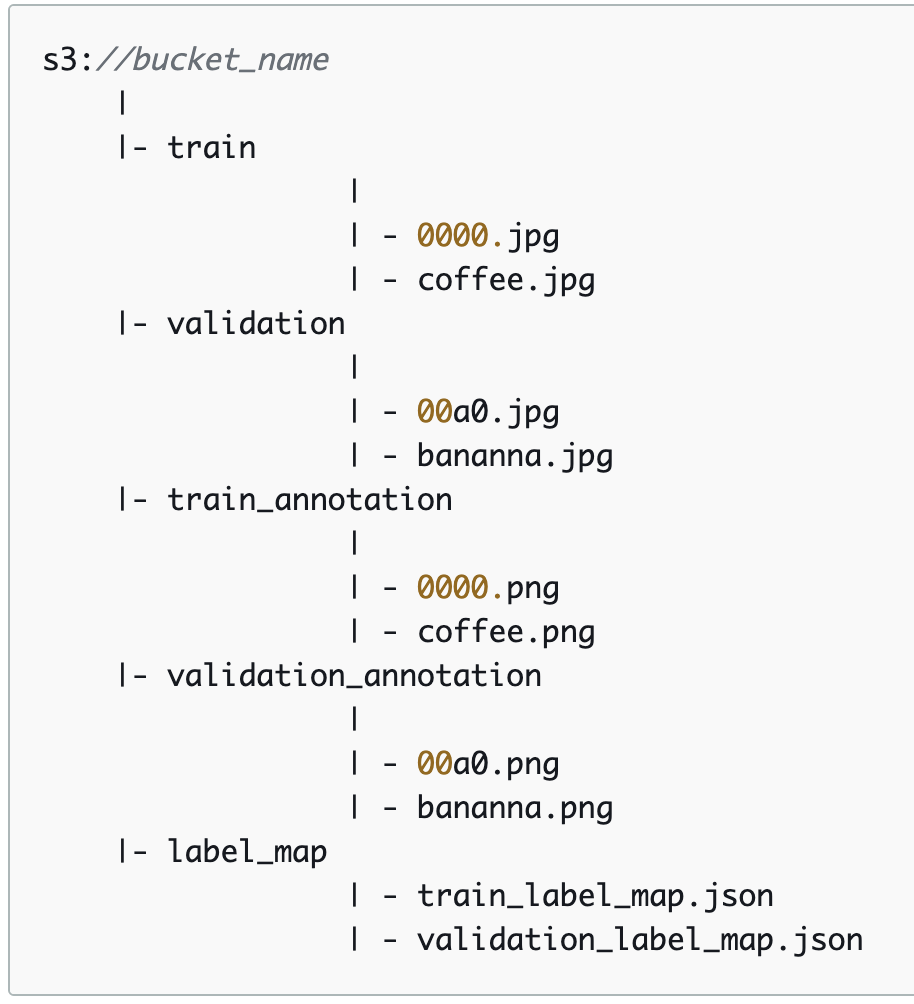
Follow the default folder structure.

f:id:fengchihsheng:20200331132032p:plain
structure

Upload dataset to notebook.

Instance type

Default Amazon SageMaker Notebook instances is ml.t2.medium and 5GB Volume Size.

5GB is not enough for training dataset.

In this case I change 5GB => 1024GB.

And Notebook instances is also slow when trying to prediction or do some other processing.

In this case I change ml.t2.medium => ml.t3.xlarge.

Default amazon sample notebook for semantic segmentation pascalvoc training instances is ml.p3.2xlarge.

When try to training it will have memory issue in this case.

So I change ml.p3.2xlarge => ml.p3.8xlarge.

Amazon SageMaker ML Instance Types :

https://aws.amazon.com/sagemaker/pricing/instance-types/

First Try

We can not use this project images because of NDA.

So I use the sample dataset present.

Use amazon sample notebook for semantic segmentation pascalvoc.

Algorithm : FCN

Backbone : resnet-50

Epoch : 10

Training time

Sample case

This is example training time.

FCN, 10 epochs, renet-50, crop size 240, use 1137 seconds (nearby 21 minutes).

Real case

This is the project training time.

PSP, 160 epochs, renet-50, crop size 512, use 5212 seconds (nearby 1 hour).

FCN, 160 epochs, renet-50, crop size 512, use 4680 seconds (nearby 1 hour).

Deeplab, 160 epochs, renet-50, crop size 512, use 7663 seconds (nearby 1 hour).

Prediction

This is one part after training.

import matplotlib.pyplot as plt
import PIL
from PIL import Image
import numpy as np
import io

im = PIL.Image.open(filename)

ss_predictor.content_type = 'image/jpeg'
ss_predictor.accept = 'image/png'

img = None
with open(str(file_list[i]), 'rb') as image:
    img = image.read()
    img = bytearray(img)
        
return_img = ss_predictor.predict(img)
 
##fix the class number when you use in training.
num_classes = 14
mask = np.array(Image.open(io.BytesIO(return_img)))
img = plt.imshow(mask, vmin=0, vmax=num_classes-1)
img.set_cmap('jet')
plt.axis('off')
plt.savefig(local_output_folder + '/' + basename + '.png', bbox_inches='tight')

After plt.savefig upload to AWS S3 and download to local machine do other process.

Fix the color and size to fit the test images.

Result :

f:id:fengchihsheng:20200331172246p:plain
prediction result

Analysis and Report

After Prediction I download the result and merge the mask with original test images.

And use IoU and FP for Analysis.

This is for one prediction result.

Color base on light

Green = correct mask

Red = prediction mask
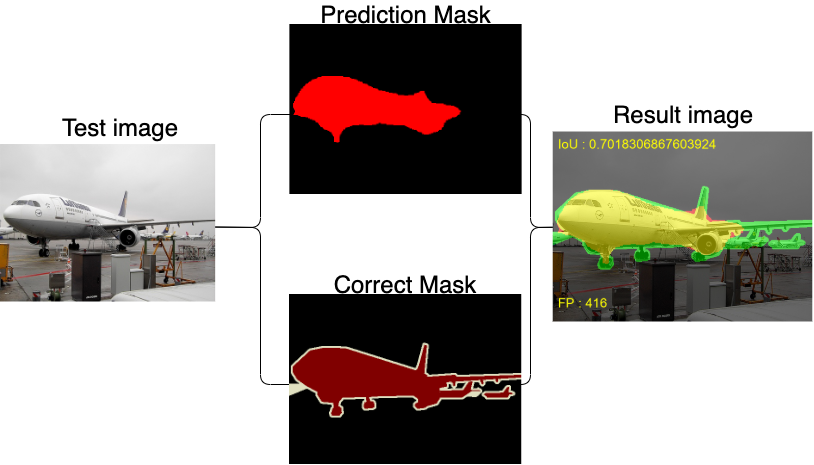
f:id:fengchihsheng:20200331171925p:plain
prediction with correct result

Amazon SageMaker Semantic Segmentation Hyperparameters

All the Hyperparameters you can find in this URL.

https://docs.aws.amazon.com/sagemaker/latest/dg/segmentation-hyperparameters.html

Algorithm

Amazon SageMaker only support FCN, PSP, Deeplab.

Default Algorithm is FCN.

f:id:fengchihsheng:20200403103432p:plain
FCN Structure

image source :

http://cvlab.postech.ac.kr/research/deconvnet/

PSP :

f:id:fengchihsheng:20200403103801j:plain
PSPnet Structure

image source :

https://blog.negativemind.com/2019/03/19/semantic-segmentation-by-pyramid-scene-parsing-network/

https://arxiv.org/abs/1612.01105

Deeplab :
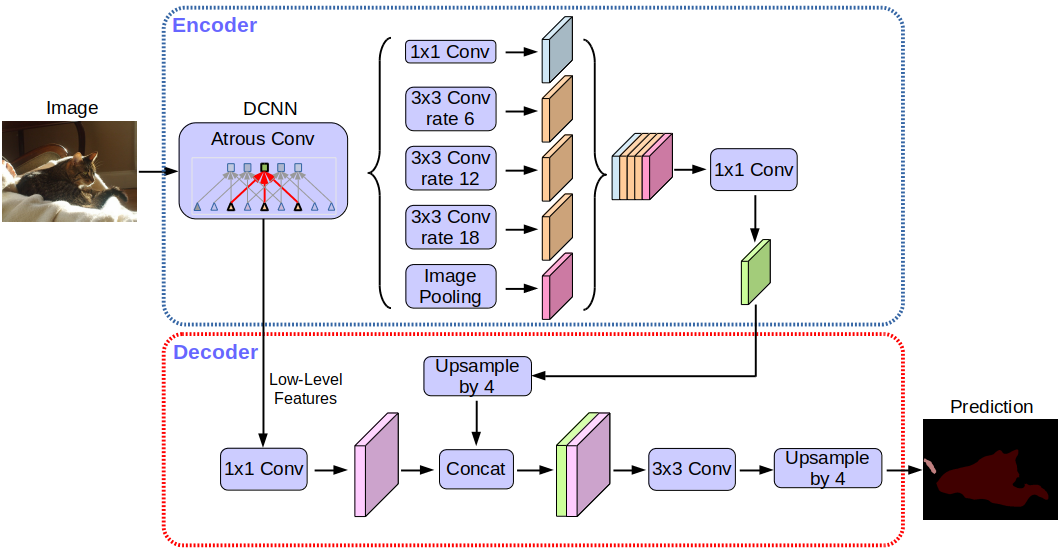
f:id:fengchihsheng:20200403124445p:plain
Deeplab Structure

image source : https://developers-jp.googleblog.com/2018/04/semantic-image-segmentation-with.html

Backbone

ResNet

What is ResNet?

ResNets solve is the famous known vanishing gradient.

Vanishing Gradient Problem occurs when we try to train a Neural Network model using Gradient based optimization techniques.

As more layers using certain activation functions are added to neural networks, the gradients of the loss function approaches zero, making the network hard to train.
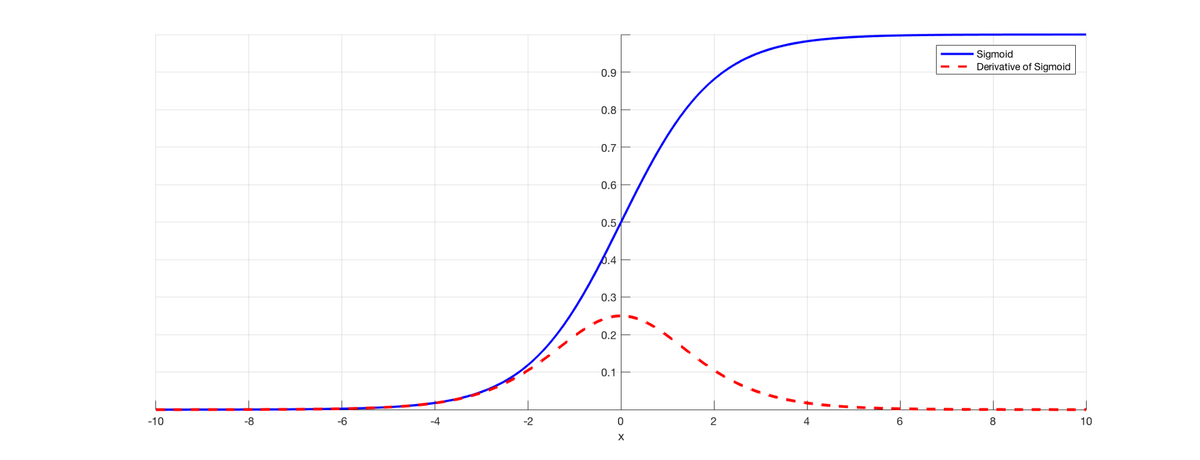
f:id:fengchihsheng:20200406174334p:plain
Certain activation functions

source : https://isaacchanghau.github.io/img/deeplearning/activationfunction/sigmoid.png

Image is the sigmoid function and its derivative. Note how when the inputs of the sigmoid function becomes larger or smaller (when |x| becomes bigger), the derivative becomes close to zero.

If you want to know more detail please check these page and video.

Vanishing Gradient Problem Reference

https://towardsdatascience.com/the-vanishing-gradient-problem-69bf08b15484

https://medium.com/@anishsingh20/the-vanishing-gradient-problem-48ae7f501257

youtu.be

With ResNets, the gradients can flow directly through the skip connections backwards from later layers to initial filters.

If you want to know more detail you can check this page.

ResNet Reference

https://towardsdatascience.com/understanding-and-visualizing-resnets-442284831be8

Amazon SageMaker only support ResNet-50, ResNet-101.

Use ResNet will get short training time and higher accuracy.

Resnet Layer Structure :
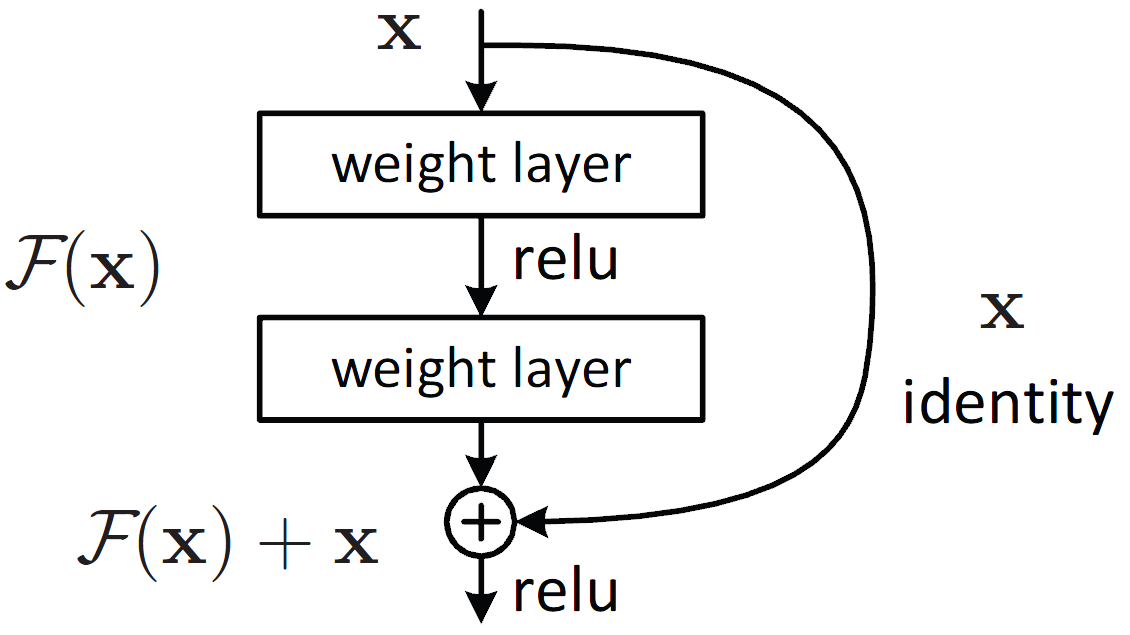
f:id:fengchihsheng:20200403110132p:plain
ResNet Structure

image source :

https://neurohive.io/en/popular-networks/resnet/

And what is 50 and 101 mean?

It mean 50-layer and 101-layer.

This is error score table. (more smaller is better)
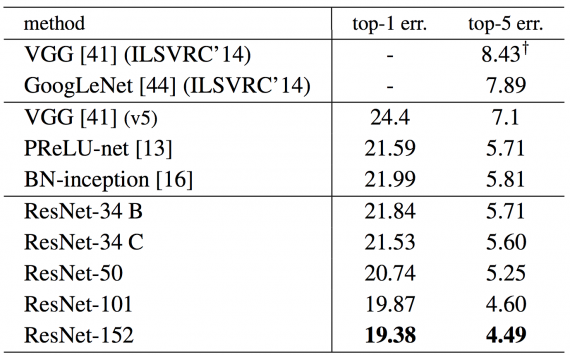
f:id:fengchihsheng:20200406180823p:plain
Error rates (%) of single-model results on the ImageNet validation set

image source :

https://neurohive.io/en/popular-networks/resnet/

Epoch
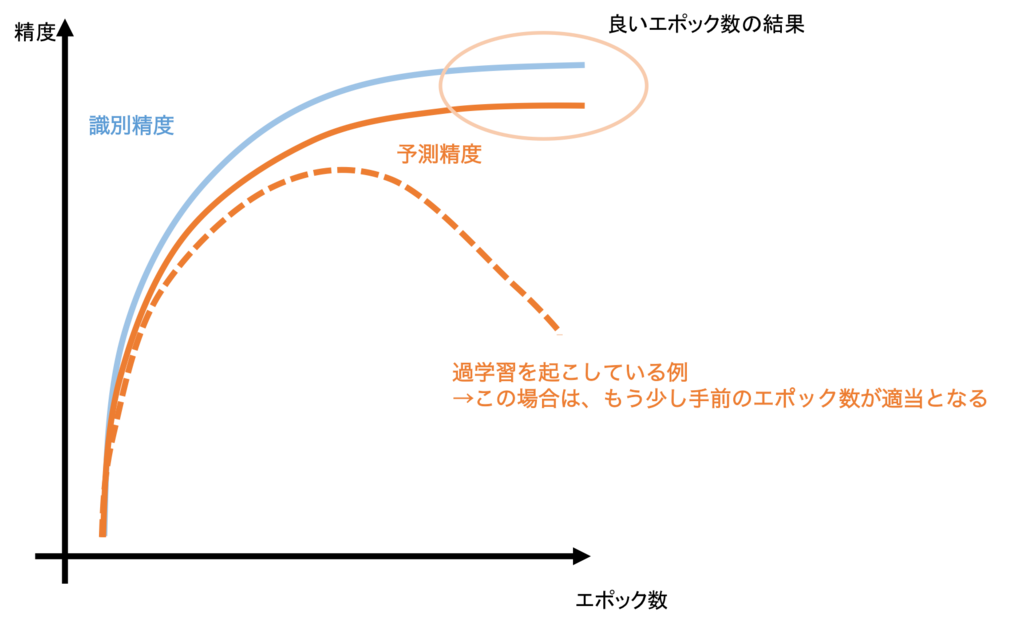
f:id:fengchihsheng:20200403120015p:plain
Epoch

image source :

https://www.st-hakky-blog.com/entry/2017/01/17/165137

Final

This is the chance let me learn about semantic segmentation on AWS sagemaker.

And use AWS sagemaker example is faster way to understand how it work.

The result from AWS sagemaker is good for this project.
Reference

labelme
labelme convert to VOC-format Dataset
AWS SageMaker

Build the map for corona virus

技術開発室の馮 志聖(マイク)です。

corona virus is terrible.

And we need to understand how terrible it is.

The most easy way is use the map and take a look how many person get sick.

Almost corona virus data is base on country.

Like this map :

https://google.com/covid19-map/?hl=en

Issue

For each Country have huge area.

It is not easy to handle distribution of details.

I think it have a lot of person want to know about degree of diffusion.

For example I live in Yokohama city.

Yokohama city in Kanagawa Prefecture and Kanagawa Prefecture in Japan.

In the map base on Country I only can get the info from Japan.

I have no idea in my City how degree of diffusion is.

It have few data base on City or Prefecture.

Solution

This is information for corona virus.

It have many website show the information and many data analysis.

https://github.com/pomber/covid19

I find an API can list all city ,GPS ,person count.

Let's try to build the map for corona virus base on city.

Use free and fast way to build it.

Structure

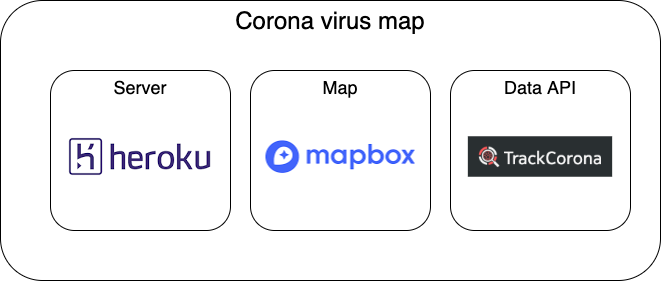
f:id:fengchihsheng:20200403202033p:plain
Structure

It is small project.

And not need any strong server.

So I choose Heroku free plan to be a server.

Map

It have two popular free resource map tools.

1.Google map

2.Mapbox

And I choose mapbox to be map.

mapbox is powerful and lighter for all device.

Why I choose mapbox not google map?

The good points of google map.

1.The best information.

Thanks to Google’s satellites, Street View vehicles, and user-generated corrections, Google’s geographical coverage is considered the best.

2.Multiple style options.

The JSON-like syntax used by Google Maps is immediately loaded along with a map. You can manage the visibility, color, and opacity of all map elements.

3.Street View.

Street View is a feature that provides interactive panoramas from different positions along lots of streets around the world. This feature can visualize Keyhole Markup Language (KML) and GeoRSS data on the map.

4.Extensive language support.

Google Maps supports many languages.

5.Information support.

You can count on a large community and multiple developers providing support.

The bad points of google map.

1.Browser limitations.

The Google Maps JavaScript API doesn’t support all web browsers.

2.Tricky pricing.

The Google Maps pricing model is not easy to sort out. And this is the biggest catch.

3.First call.

Autocomplete makes a call for all letters typed in the search bar.

4.Second call.

Another API call is made when a location is selected.

5.Third call.

Directions are added to the nearest location.

6.Usage limitations.

The free plan for Google Maps is limited to 10 queries per second.

The good points of Mapbox.

1.Unique customization options.

Mapbox is more customizable than Google Maps.

2.Open-source SDKs.

Mapbox Maps SDKs are open-source. Mapbox shares their code on GitHub so it can always be seen, analyzed, and improved.

3.Integration with PubNub.

Mapbox partners with PubNub, which offers infrastructure-as-a-service for live data streaming, builds dynamic map visualizations from real-time data, and incorporates functionality like asset tracking, geocoding, and heatmaps.

4.Mapbox AR.

The Mapbox Maps SDK for Unity allows for building location-based experiences using points of interest (POIs) all over the world. You can add locations using drag-and-drop maps and POIs, 3D buildings and terrain, place-based AR, and more.

5.Offline maps.

There’s no offline mode with the Google Maps API. More precisely, offline mode is available in the branded Google Maps app.

The bad points of Mapbox.

1.Relatively weak coverage.

There are many places where Google has better coverage than OSM based services.

Reference

In this blog have detail info about google map vs mapbox.

https://yalantis.com/blog/mapbox-maps-ready-mobile-apps/

Data API

Data API is come from trackcorona.

https://www.trackcorona.live/api

They already have map and data analysis.

But I want simple and customize.

Task

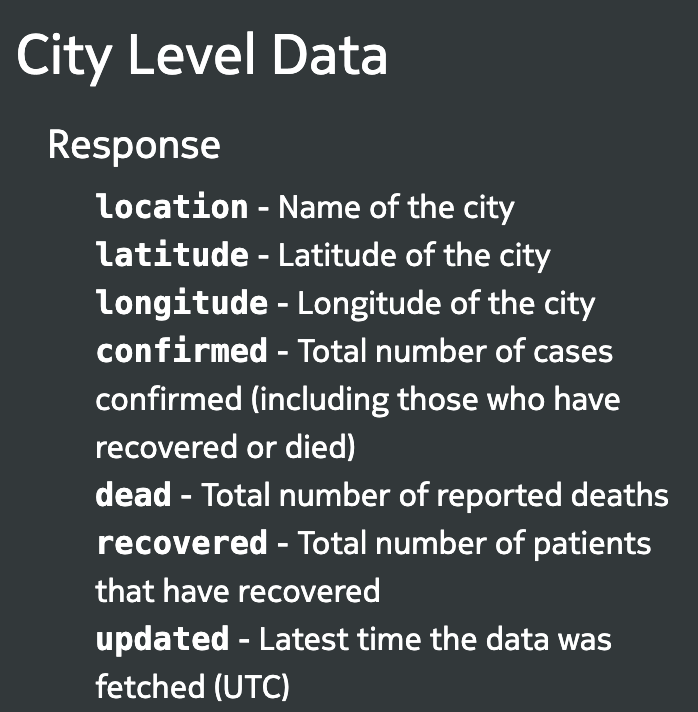
First I try to analysis the API response and find out the key and data format.

f:id:fengchihsheng:20200403203007p:plain
API

https://www.trackcorona.live/api

Second I try to read mapbox document and use example to customize.

I choose this example to be map UI.

https://docs.mapbox.com/mapbox-gl-js/example/cluster-html/

In this example circle only have one number.

But data have other data need to show it.

So I choose popup on click example to show the info.

https://docs.mapbox.com/mapbox-gl-js/example/popup-on-click/

Third when I use mapbox it need geojson format datasource.

I use this library to convert it.

GitHub - caseycesari/GeoJSON.js: Turn your geo data into GeoJSON. For Node.js and the browser.

Fourth I try to add chart in the popup but it not show all the area.

Then I use this example for fix this issue.

https://docs.mapbox.com/mapbox-gl-js/example/center-on-symbol/

Fifth use the most sample way to show the chart.

I use SVG and regist new element and create it.

Sixth it have update time need to compare.

I use moment.js to compare the UTC date and time.

https://momentjs.com/

Seventh I try to deploy it to Heroku.

I use the most sample php buildpack to build it.

https://devcenter.heroku.com/categories/php-support

At last when load the website on heroku website it will have issue.

Because of document.registerElement is not a function.

I use this library to solve the issue.

https://github.com/WebReflection/document-register-element

Final

I success build the corona virus map base on city.

This website is build by myself.

https://test-web-gyo.herokuapp.com/corona_virus/map.html

In this case I learning how to put the data on the map and show it.

mapbox have many API and many function can use.

And mapbox is light map for all device.

TeamsやZoomでカメラ画像を加工する方法 その3 アニメ風画像に変換するの巻

みなさんこんにちは。技術開発室の岡田です。

前回と前々回の投稿では、TeamsやZoomでカメラ画像を加工する方法をご紹介しました。これらの投稿では、笑顔や感情(表情)を検出してニコニコマークを表示するデモをご紹介しています。

cloud.flect.co.jp

今回、もう少し拡張して、画像をアニメ風に変換して表示する実験をしてみたので、ご紹介します。最初にネタバレしておくと、リアルタイムでアニメ風画像に変換するにはCPUだとちょっとラグが大きすぎて使いづらいかなと思います。(GPUだとマシになるのかは試してない。)

f:id:Wok:20200402051722p:plain

それでは早速ご紹介いたします。

アニメ風画像変換

半年ほど前にニュースメディアにも取り上げられていたようなので、ご存知の方も多いかと思いますが、写真をアニメ風に変換する手法が下記のページで公開されています。

github.com

このUGATITでは、単純なimage2imageのスタイル変換とは違い、GeneratorとDiscriminatorを用いるいわゆるGANの技術をベースに、独自のAdaLINという機能を追加することで形状の変化にも対応ができるようになったようです。

In our work, we propose an Adaptive Layer-Instance Normalization (AdaLIN) function to adaptively select a proper ratio between IN and LN. Through the AdaLIN, our attention-guided model can flexibly control the amount of change in shape and texture.

詳細は、本論文*1や解説記事*2を見ていただくとして、上記ページに公開されているトレーニング済みのモデルを使って、実際に変換してみるとこんな感じになります。

f:id:Wok:20200402042837p:plain

被写体が遠いとあまりうまく変換してくれないようです。また、おじさんはあまりうまく対応できていないみたいです。トレーニングで用いられたデータセットも上記ページで公開されていますが、若い女性に偏っているようなので、これが原因かと思われます。(私はまだおじさんではない、、、というのは無理があるか。)

実装の概要

上記のとおり、被写体(人物の顔)に近い画像(≒顔が画面の大部分を占める)にする必要がありそうです。今回は、前々回までにご紹介した顔検出機能により顔の場所を特定し、その場所を切り出してUGATITで変換をかけるという手順でやってみました。

f:id:Wok:20200402045508p:plain

実装の詳細は、下記で言及するリポジトリをご参照ください。*3

環境構築

前回までの記事を参考に、v4l2loopbackや、顔認識のモデルなどを準備しておいてください。

また、前回までと同様に、下記のリポジトリからスクリプトをcloneして、必要なモジュールをインストールしてください。

$ git clone https://github.com/dannadori/WebCamHooker.git
$ cd WebCamHooker/
$ pip3 install -r requirements.txt

UGATITのトレーニング済みモデルの配置

UGATITの公式ではTensorflow版とPyTorch版のソースコードが提供されていますが、トレーニング済みのモデルはTensorflow版しかないようです。これを取得して展開してください。なお、WindowsLinuxの通常のzip展開ツールだと展開に失敗するようです。Windowsを用いる場合は7zipだとうまく行くという報告がissueに上がっています。また、Macだと問題は発生しないようです。なお、Linuxは解決策は不明です・・・。*4

一応、正常に動くモデルのハッシュ値(md5sum)を記載しておきます。(多分ここが一番のつまずきポイントなので。)

$ find . -type f |xargs -I{} md5sum {}
43a47eb34ad056427457b1f8452e3f79  ./UGATIT.model-1000000.data-00000-of-00001
388e18fe2d6cedab8b1dbaefdddab4da  ./UGATIT.model-1000000.meta
a08353525ecf78c4b6b33b0b2ab2b75c  ./UGATIT.model-1000000.index
f8c38782b22e3c4c61d4937316cd3493  ./checkpoint

これらのファイルを上記git からcloneしたフォルダの、UGATIT/checkpointに格納します。このような感じになっていればOKです。

$ ls UGATIT/checkpoint/ -1
UGATIT.model-1000000.data-00000-of-00001
UGATIT.model-1000000.index
UGATIT.model-1000000.meta
checkpoint

ビデオ会議をしてみよう!

実行は次のように行います。オプションが一つ追加されてます。

  • input_video_num には実際のウェブカメラのデバイス番号を入れてください。/dev/video0なら末尾の0を入力します。
  • output_video_dev には仮想ウェブカメラデバイスのデバイスファイルを指定してください。
  • anime_mode はTrueにしてください。

なお、終了のさせ方はctrl+cでお願いします。

$ python3 webcamhooker.py --input_video_num 0 --output_video_dev /dev/video2 --anime_mode True

上のコマンドを実行するとffmpegが動き、仮想カメラデバイスに映像が配信されはじめます。

前回と同様に、ビデオ会議をするときにビデオデバイスの一覧にdummy〜〜というものが現れると思うのでそれを選択してください。 これはTeamsの例です。画面上右上にワイプで変換元の画像も表示しています。思ったよりちゃんとアニメ風に変換されて配信されますね。ただし、とても重く、ちょっと古めのPCだと1秒1コマとかそういうレベルです。*5 普通に運用するには厳しいかもしれません。いまのところは出落ち要員かな。いずれGPUでも試してみたいと思います。

f:id:Wok:20200402051909g:plain

最後に

在宅勤務が長引き、気軽なコミュニケーションがなかなか難しいかもしれませんが、こういった遊び心をビデオ会議に持ち込んで、会話を活性化させるのもいいのではないかと思っています。 もっといろいろできると思いますので、みなさんもいろいろ試してみてください。

*1:https://arxiv.org/abs/1907.10830

*2:【論文紹介】U-GAT-IT ざくっと理解するにはこのスライドが良さそう。

*3:2020/4/2現在、注ぎ足しつぎ足しで作っているので、ソースコードが汚い。どこかでリファクタリングします

*4:いずれも2020/4/2現在

*5:Intel(R) Core(TM) i7-4770 CPU @ 3.40GHz, 32G RAM

TeamsやZoomでカメラ画像を加工する方法 その2 Tensorflowで感情分析の巻

みなさんこんにちは。技術開発室の岡田です。

前回はTeamsやZoomでカメラ画像を加工する方法をご紹介し、 笑顔を検出してニコニコマークを表示するデモをご紹介いたしました。

cloud.flect.co.jp

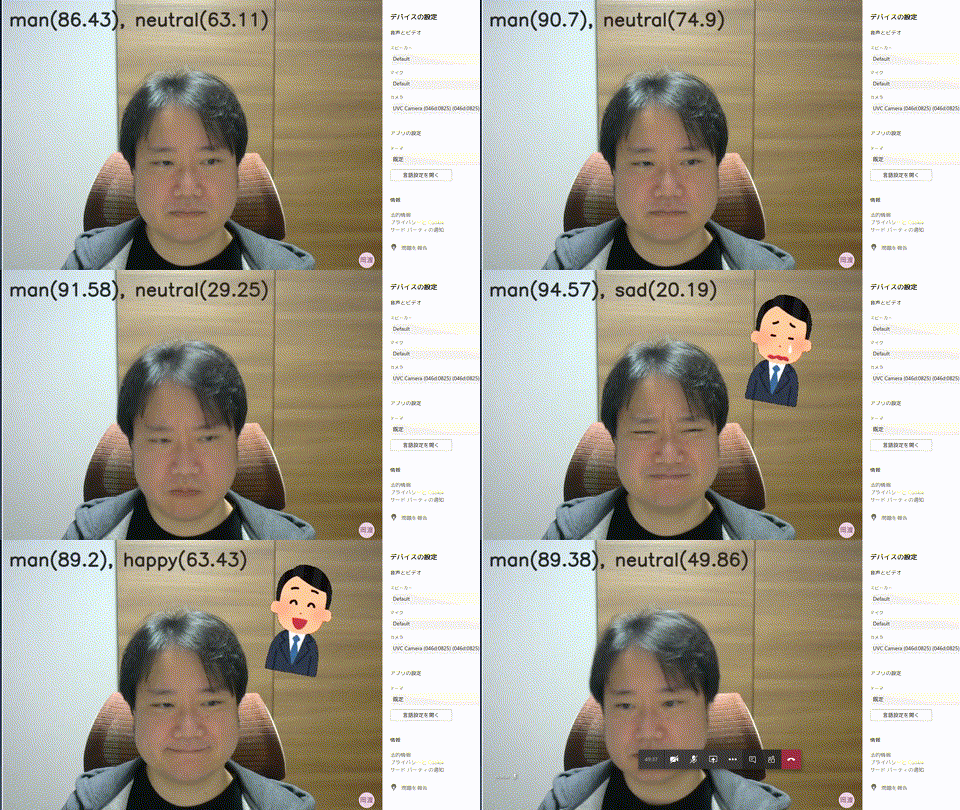
今回は、これを少し拡張して、AI(Tensorflow)でリアルタイムに感情分析することに挑戦しましたので、ご紹介いたします。 具体的には、次のように、画像に写った人物の表情から悲しみや怒りと言った感情を読み取り、それに合わせた画像を画面に表示します。これでビデオ会議で言葉を発しなくても感情を伝えることができそうですね。(いや待て、、)

f:id:Wok:20200401172359g:plain

前提

前回の記事を参考に、v4l2loopbackなどを設定しておいてください。

Webカメラのフックの拡張

今回は、カメラで取られた人物の感情を分析して、対応する画像をビデオストリーム上の映像に表示します。 感情分析にはTensorflowを用いますが、次のサイトでトレーニング済みのモデルがMITライセンスで提供されているので、これを利用させてもらいましょう。

github.com

まず、最初に前回と同様に下記のリポジトリから、スクリプトをcloneして、必要なモジュールをインストールしてください。

$ git clone https://github.com/dannadori/WebCamHooker.git
$ cd WebCamHooker/
$ pip3 install -r requirements.txt

次に、先程のサイトから感情分析用のトレーニング済みのモデルを取得します。 なお、今回は、適切な画像を表示するために、性別判断も同時に行おうと思います。

$ wget https://github.com/oarriaga/face_classification/raw/master/trained_models/emotion_models/fer2013_mini_XCEPTION.110-0.65.hdf5 -P models # 感情分析用のモデル
$ wget https://github.com/oarriaga/face_classification/raw/master/trained_models/gender_models/simple_CNN.81-0.96.hdf5 -P models/ # 性別判定用のモデル

また、画像を再びいらすとやさんからお借りしましょう。

$ wget https://4.bp.blogspot.com/-8DirG_alwXo/V5Xc1SMykvI/AAAAAAAA8u4/krI2n_SWimUBGEyMWCw5kZZ-HzoUKrY8ACLcB/s800/pose_sugoi_okoru_woman.png -P images/
$ wget https://4.bp.blogspot.com/-EBpxVigkCCY/V5Xc1CHSeEI/AAAAAAAA8u0/9XIAzDJaQNU3HIiXi4PCPK3aMip3aoGyACLcB/s800/pose_sugoi_okoru_man.png -P images/

$ wget https://4.bp.blogspot.com/-HJ0FUQz67AA/XAnvUxSRsLI/AAAAAAABQnM/3XzIWzvW6L80aGB-geaHvAQETlJTAwkYQCLcBGAs/s800/business_woman2_4_think.png -P images/
$ wget https://3.bp.blogspot.com/-S7iQQCOgfWY/XAnvQWwBGtI/AAAAAAABQmc/z7yIqGjIQr88Brc_QNdOGsrJRLvqY1hcQCLcBGAs/s800/business_man2_4_think.png -P images/

$ wget https://4.bp.blogspot.com/-PQQV4wfGlNI/XAnvQBMeneI/AAAAAAABQmU/lN7zIROor9oi3q-JZOBJiKKzfklzPE1hwCLcBGAs/s800/business_man2_2_shock.png] -P images/
$ wget https://3.bp.blogspot.com/-QcDbWqQ448I/XAnvUT4TMDI/AAAAAAABQnE/_H4XzC4E93AEU2Y7fHMDBjri1drdyuAPQCLcBGAs/s800/business_woman2_2_shock.png -P images/

$ wget https://3.bp.blogspot.com/-dSPRqYvIhNk/XAnvPdvjBFI/AAAAAAABQmM/izfRBSt1U5o7eYAjdGR8NtoP4Wa1_Zn8ACLcBGAs/s800/business_man1_4_laugh.png -P images/
$ wget https://1.bp.blogspot.com/-T6AOerbFQiE/XAnvTlQvobI/AAAAAAABQm8/TYVdIfxQ5tItWgUMl5Y0w8Og_AZAJgAewCLcBGAs/s800/business_woman1_4_laugh.png -P images/

$ wget https://4.bp.blogspot.com/-Kk_Mt1gDKXI/XAnvS6AjqyI/AAAAAAABQm4/LQteQO7TFTQ-KPahPcAqXYannEArMmYfgCLcBGAs/s800/business_woman1_3_cry.png -P images/
$ wget https://4.bp.blogspot.com/-3IPT6QIOtpk/XAnvPCPuThI/AAAAAAABQmI/pIea028SBzwhwqysO49pk4NAvoqms3zxgCLcBGAs/s800/business_man1_3_cry.png -P images/

$ wget https://3.bp.blogspot.com/-FrgNPMUG0TQ/XAnvUmb85VI/AAAAAAABQnI/Y06kkP278eADiqvXH5VC0uuNxq2nnr34ACLcBGAs/s800/business_woman2_3_surprise.png -P images/
$ wget https://2.bp.blogspot.com/-i7OL88NmOW8/XAnvQacGWuI/AAAAAAABQmY/LTzN4pcnSmYLke3OSPME4cUFRrLIrPsYACLcBGAs/s800/business_man2_3_surprise.png -P images/

$ cp images/lN7zIROor9oi3q-JZOBJiKKzfklzPE1hwCLcBGAs/s800/business_man2_2_shock.png]  images/lN7zIROor9oi3q-JZOBJiKKzfklzPE1hwCLcBGAs/s800/business_man2_2_shock.png

上記のうち、最後のコマンドは、ファイル名にゴミ(末尾のカギカッコ)がついているので取り除いているだけです。

実行は次のように行います。オプションが一つ追加されてます。

  • input_video_num には実際のウェブカメラのデバイス番号を入れてください。/dev/video0なら末尾の0を入力します。
  • output_video_dev には仮想ウェブカメラデバイスのデバイスファイルを指定してください。
  • emotion_mode はTrueにしてください。

なお、終了のさせ方はctrl+cでお願いします。

$ python3 webcamhooker.py --input_video_num 0 --output_video_dev /dev/video2 --emotion_mode True

上のコマンドを実行するとffmpegが動き、仮想カメラデバイスに映像が配信されはじめます。

ビデオ会議をしてみよう!

前回と同様に、ビデオ会議をするときにビデオデバイスの一覧にdummy〜〜というものが現れると思うのでそれを選択してください。 これはTeamsの例です。表情に合わせて画面上部の文字列が変化し、合わせて対応する画像が表示されますね。大成功です。

f:id:Wok:20200401172359g:plain

最後に

在宅勤務が長引き、気軽なコミュニケーションがなかなか難しいかもしれませんが、こういった遊び心をビデオ会議に持ち込んで、会話を活性化させるのもいいのではないかと思っています。 もっといろいろできると思いますので、みなさんもいろいろ試してみてください。

参考

Tensorflowによる感情分析については次のサイトを参考にさせていただきました。 (このサイトではtensorflowjsでの紹介をされております)

book.mynavi.jp

TeamsやZoomでカメラ画像を加工する方法

みなさんこんにちは。技術開発室の岡田です。

現在FLECTでは、東京都知事の要請を受け、新型コロナウイルス感染予防対策および拡散防止のため原則在宅勤務となっております。 同じような対応を取られている企業様も多く、様々な困難があるかと思いますが、ぜひ力を合わせてこの難局を乗り越えていきたいと考えています。

さて、原則在宅勤務が長引いてくると、日頃行われていた何気ない会話ができないなど、ストレスも溜まってくることも考えられます。 そんな状況で一つでもクスっと笑えて息抜きができる状況が作れればよいなという思いで、一つ小ネタをご紹介します。

内容は、マイクロソフトのTeamsやZoomなどのビデオ会議において、ウェブカメラをフックして加工して配信する方法です。 私がLinux使いのため、今回はLinuxでのご紹介となります。他のプラットフォームも何れ何処かで紹介されると思います。

なお、「一つでもクスっと笑えて息抜きができる状況」を作るのも時と場合を選びますので、そこは自己責任でお願いします(^_^)/。

f:id:Wok:20200331140931g:plain

前提

大抵のLinuxシステムで問題なく動くと思いますが、私が作業した環境はDebianのBusterです。

$ cat /etc/debian_version
10.3

また、python3が入っていないようでしたら、導入しておいてください。

$ python3 --version
Python 3.7.3

関連ソフトウェアのインストール

仮想ウェブカメラデバイス

今回はv4l2loopbackという仮想ウェブカメラデバイスを用います。 github.com

仮想ウェブカメラデバイスと、実際のウェブカメラを識別する必要があるので、まずは実際のウェブカメラのデバイスファイルを確認しておきます。 下記の例だと、video0とvideo1が実際のウェブカメラに割り当てられているようです。

$ ls /dev/video*
/dev/video0  /dev/video1

それでは、v4l2loopbackを導入しましょう。 まずはgit cloneしてmakeしてインストールしてください。

$ git clone https://github.com/umlaeute/v4l2loopback.git
$ cd v4l2loopback
$ make
$ sudo make install

次に、モジュールをロードします。このとき、特にchromeで認識させるためには、exclusive_caps=1をつけてあげる必要があるようです。https://github.com/umlaeute/v4l2loopback/issues/78

sudo modprobe v4l2loopback exclusive_caps=1

これでモジュールがロードされたと思いますので、デバイスファイルを確認しておきましょう。下記の例だとvideo2が追加されていますね。

$ ls /dev/video*
/dev/video0  /dev/video1  /dev/video2
ffmpeg

仮想ウェブカメラデバイスにデータを送り込むにはffmpegを用いるのが一番簡単です。 apt-getなどでさくっと導入しておいてください。

Webカメラのフックと映像の配信

今回は、笑顔を検出したら画像加工を施してみようと思います。 笑顔を検出したら、映像上に笑顔マークを表示します。

まず、次のリポジトリのファイルをcloneしてモジュールをインストールしてください。

$ git clone https://github.com/dannadori/WebCamHooker.git
$ cd WebCamHooker/
$ pip3 install -r requirements.txt

ここからcascadeファイルを入手します。cascadeファイルの詳細はopencvの公式でご確認ください。 https://github.com/opencv/opencv/tree/master/data/haarcascades

$ wget https://raw.githubusercontent.com/opencv/opencv/master/data/haarcascades/haarcascade_frontalface_default.xml -P models/
$ wget https://raw.githubusercontent.com/opencv/opencv/master/data/haarcascades/haarcascade_smile.xml -P models/

笑顔マークをいらすとやさんからお借りしましょう。

$ wget https://4.bp.blogspot.com/-QeM2lPMumuo/UNQrby-TEPI/AAAAAAAAI7E/cZIpq3TTyas/s160/mark_face_laugh.png  -P images/

こんな感じのフォルダ構成になってるといいです。

$ ls -1
haarcascade_frontalface_default.xml
haarcascade_smile.xml
mark_face_laugh.png
webcamhooker.py

実行は次のように行います。 --input_video_num には実際のウェブカメラのデバイス番号を入れてください。/dev/video0なら末尾の0を入力します。 --output_video_dev には仮想ウェブカメラデバイスのデバイスファイルを指定してください。 なお、終了のさせ方はctrl+cでお願いします。

$ python3 webcamhooker.py --input_video_num 0 --output_video_dev /dev/video2

上のコマンドを実行するとffmpegが動き、仮想カメラデバイスに映像が配信されはじめます。

ビデオチャットをしてみよう!

ビデオチャットをするときにビデオデバイスの一覧にdummy〜〜というものが現れると思うのでそれを選択してください。 これはTeamsの例。左右がそれぞれの参加者の画面だと思ってください。 左側が今回の仮想カメラデバイスを使っているユーザです。右側が受信側です。 ニッコリすると笑顔マークが出ますね。大成功(^_^)/。

f:id:Wok:20200331140931g:plain

最後に

対面のコミュニケーションが難しい今、ビデオチャットを使ってもっと楽しめたらいいですね。 今回は笑顔を検出して画像を加工する例で示しましたが、opencvやその他のツールを使って工夫次第でいろんな加工ができると思います。 ぜひいろいろ試してみてください!

参考

opencvでの笑顔検出はこちらを参考にさせていただきました。

qiita.com

opencvでの画像貼り付けはこちらを参考にさせていただきました。

qiita.com

AWS Lambdaを使って機械学習トレーニングの前処理を高速化した話

みなさんこんにちは。技術開発室の岡田です。

私は主に機械学習&AI案件を担当しており、クラウドインテグレーションを主な生業としているFLECTには珍しく、クラウドとは少し距離を置いたところにいるエンジニアでした。 具体的な経験としては、GCPインスタンスを立ち上げてモデルをトレーニングするくらい。 しかし、去年の12月の re:Invent2019でSageMakerの大幅アップデートがあり*1機械学習&AIのエンジニアもクラウドを使いこなせなければならない時代になったのだなぁと思うに至りまして、一念発起して、ここ1〜2ヶ月は結構AWSの勉強してました。 結果、この度認定資格(Associate3種)を取得いたしました。わーい(にっこり)。

これでクラウドエンジニアとしての入り口くらいには立てたかな? f:id:Wok:20200306104716p:plain

ということで、クラウド初心者ではあるのですが、ひとつ勉強がてらにとAWS Lambdaを使って機械学習の前処理の高速化を行ったので、これについて投稿します。

機械学習の前処理とAWS Lambda

機械学習のモデル開発では前処理という重要なステップがあります。 一言に前処理といってもこれはかなり広い概念で、対象データの抽出、データの結合、各種変換、テストデータの分割などが含まれます。各種変換の中には、より高い精度のモデルを作成するために与えられた特徴量からより良い特徴量を生成するFeature Engineeringと呼ばれる処理をすることも含まれます。 典型的なパターンでは、前処理のなかでも最初の方で必要なデータだけを抽出してデータ量を減らし、その後に続く処理の計算コストを抑えるという流れが良いとされています。*2

画像の分類モデルを開発する場合も同様に、最初に重複する画像を排除するなどして無駄な計算コストがかからないようにします。また、これはモデルの性能に影響が出る場合があるので、性能と計算コストとのトレードオフで実施するかを決めることになりますが、必要以上に大きなサイズの画像のリサイズを初めの方に行うことで、後に続く画像処理の計算コストを減らしたりもします。

私が関わっているある画像分類プロジェクトでは、前処理でどうしても人手を介さなければならないところがあるのですが、この場合でも予め、重複している画像を排除し、無駄に大きな画像を作業可能な大きさにリサイズすることで、人による作業コストも減らすことができます。 ただ、この画像のリサイズに結構な時間がかかるため、毎月大量に提供される学習用の画像データをリサイズする間、待ち時間が発生してしまうという課題がありました。 これまでは、単純に32コアのサーバを用意して、フル回転でリサイズ処理をすることで時間を短縮するようにしていましたが、それでも場合によっては数時間レベルの待ち時間が発生することがあり、帰宅前に処理を流してから帰る、なんてこともしていました。

ところが、AWS Lamdaはデフォルトで1000並列まで並列処理できると。それもサーバレスで。(AWSに詳しい方からすると、いまさら、、、という話かもしれませんが。) 1000並列なら単純計算でざっくり30倍くらいの速度で処理ができるはずです。処理時間が1/30になる!試してみたい!!ということで、評価してみました。

評価環境

今回は、手元にあった画像80739枚をリサイズする処理で評価してみたいと思います。 また、ざっくりとした、構成図は次のような感じです。 f:id:Wok:20200309125529p:plain

一方(左側)は、32コアのサーバで処理をします。*3。 ローカルディスクから画像を読み出してリサイズして書き戻します。なお、CPUネックになることは確認済みです(ドライブネックにはなっていない)。

もう一方(右側)は、AWS LambdaをAPI Gateway経由で呼び出せるようにし、クライアントからこれをコールすることで処理をします。 1000並列!とイキっていましたが、並列度の上限の1000を使い切ると別で行っている処理に影響が出てしまう可能性があるので、今回は300並列を上限として実施することにします。それでも10倍近い高速化はできると思われます。 画像は、S3から読み出して、リサイズして、書き戻します。

なお、今回使用したコードは次のリポジトリに置いてあります。

github.com

結果と考察

実際にリサイズをさせてみた結果です。 f:id:Wok:20200309120732p:plain

32コアサーバでは852秒かかっていたのですが、AWS Lambdaでは198秒で完了しました。 かなり高速化できたのですが、見込んでいた10倍の速度には程遠かったです。残念。

今回のクライアントは1画像ごとに1API(Lamda)を呼び出しているのですが、 AWS Lambdaは、並列実行数の上限を超えるリクエストを受け付けると例外を発生させてしまうので、一気に全画像数のリクエストを送信することができません。 今回は、クライアントからの呼び出しを300並列に抑えており(300のうち1つ終わったら次のリクエストを送るという形。)、この結果、HTTPの送受信のオーバヘッドが見えてきてしまっているのだろうと思います。

改善版と評価

そこで、次は、今回の画像の枚数を300で割った数分だけ、1回のリクエストでリサイズ要求すれば、HTTPのオーバヘッドも見えなくなるだろうと考えました。つまり、300個のリクエストで終わるように呼び出し方を変える。 しかし、API Gatewayタイムアウトが最大29秒という制限があり、1回のリクエストで多くの画像を処理しているとタイムアウトしてしまいます。 そこで、1200分割して投げれば1回のリクエストあたり大体25秒程度で完了することが実験的に特定できたので、この分割でHTTPのオーバヘッドを見えづらくすることとしました。 さらに、AWS Lambdaの中でもシーケンシャルに実行するとS3とのやり取りでオーバヘッドが見えてくると考えられるので、AWS Lambda内部も並列実行可能にします。これなら、かなり目論見に近い高速化ができるのではないだろうか。 結果がこちらです。左が32コアサーバでの処理時間。真ん中が1リクエストあたり1画像を処理するAWS Lambdaの場合の処理時間。右が今回の改善版の処理時間です。 f:id:Wok:20200309123428p:plain

今回の改善版は103秒で処理を完了させることができました。10倍とまではいきませんでしたがかなり近い値まで高速化できました。 まだチューニングの余地もあると思いますが、ざっくりと目論見の成果が得られたので、今回の評価はここまでとしたいと思います。

考察

今回、大量の並列実行が可能なAWS Lambdaを用いて、機械学習で困っていた前処理にかかる時間を短縮してみました。 結果、正しく並列度を上げる構成にすれば並列度に応じた高速化が実現できることがわかりました。(アムダールさん万歳。) この事実は当たり前といえばそれまでですが、AWS Lambdaはマネージドサービスであり、並列度を簡単に低コストで上げることができるので、より強力な考え方になると思います。

なお、機械学習の前処理の高速化というところだと、AWS EMRとか使う話もあるようですが、これはリソースの確保が必要で比較的ハードルが高いと思いますので、手間をかけずに高速化するにはAWS Lambdaでも十分かなという印象です。

最後に

今回は、私の担当に関するということで機械学習の前処理を対象にして実験してみましたが、特にこれに限定される効果ではありません。私は、このLambdaで並列実行する方式で、Tensorflowの画像分類モデルを動かし、大量のデータのAIによる事前ラベリングを高速に実施させています。これについても機会があれば、ご紹介したいと思います。

皆様も、並列実行可能ではあるがハードウェアの制限により並列度を上げられないという処理があるようでしたら一度お試しになると良いかと思います。

それでは。

余談

今回、短期間でAWS 認定資格 Associate3種を取ったのですが、これは、FLECTにはAWSSalesforceなどの各資格を取得するための支援プログラムがあること、そしてFLECTには有識者も多数在籍していることが有利に働いたかなと思っています。 ポイントを抑えた効率のよい勉強をするためには、環境って重要ですよね。

*1:AWS re:Invent2019のSageMaker関連のレポートはこちら。cloud.flect.co.jp

*2:参考:前処理大全 技術評論社 前処理だけで1冊の本に仕立てている。平易な文章ながら基本を網羅している印象。個人的にはベストプラクティスを「〜〜するとよいでしょう。」と優しい口調で諭してくれるところが好き。

*3:ここでは、300プロセスを32コア上に載せている。簡易的な評価なのでコンテキストスイッチのオーバーヘッドとか細かいことは無視しています。32プロセスだとIOの間コアが遊ぶので、まぁどっこいどっこいと信じてる。

SalesforceのプラットフォームイベントをPostmanから発行する

こんにちは、技術開発室の藤野です。

プラットフォームイベント(Platform Events)はSalesforceでイベント駆動型のアーキテクチャを実現する仕組みです。 特に、Salesforce外部からのレコード操作を疎結合にする手段として有用なのではと個人的に注目しています。

詳しくは公式ガイドを参照してください。

本記事では例として下記のシチュエーションを実現する一連の手順を紹介します。

  • Salesforceは「デバイス」カスタムオブジェクトを持つ
  • 「デバイス」カスタムオブジェクトは「シリアルナンバー」「状態」カスタム項目を持つ
  • バイスの識別は「シリアルナンバー」カスタム項目で行う
  • 「状態」カスタム項目をイベントプラットフォーム経由で更新する
  • REST APIで上記イベントを公開(publish)する

目次:

  • カスタムオブジェクトの作成
  • プラットフォームイベントの作成
  • プロセスの作成
  • 接続アプリケーションの作成
  • イベントの発行によるレコードの更新
    • 更新対象レコードの準備
    • PostmanでのREST APIの送信
  • まとめ
  • 補足

カスタムオブジェクトの作成

まず、イベントで更新するカスタムオブジェクトを作成します。 シリアルナンバーと状態を持つだけの単純なものです。

Salesforce上で[設定]-タブの[オブジェクトマネージャ]-[作成]-[カスタムオブジェクト]と進み、新規カスタムオブジェクトを作成します。

続きを読む