This is Shuochen Wang from R&D department in Flect. In this blog I am going to share my implementation on controlling AR remote instruction app by hand gestures.
Introduction
Why do we need remote instruction?
The Coronavirus has forever changed the way of living. One of the changes is avoiding face-to-face communication if necessary. Remote instruction is the perfect solution for the current problem because it eliminates the needs of the instructor to go to the operation site. The reason for the instructor could not go to the operation site could either be it is not recommended or impossible (for example overseas). Therefore, the need for remote instruction is ever increasing.
I have been working on developing a remote instruction app for the iPhone since last year. This year, my focus is on the ways to control the remote instruction using hand gestures. In March this year, I have published a blog about Manipulate AR objects using UI Gesture and Hand Gesture. In that blog, I have introduced how to set up AR world map, adding AR objects and then controlling them using UI gestures and hand gestures.
Type of different control methods
The previous blog has explained how to implement the most basic type of controls: translation and rotation. There are actually many other ways to control the AR object in the scene.
In order to implement all the missing controls, it is necessary to study how other MR (Mixed Reality) devices are controlling the objects. Here, MR devices mainly refers to Oculus Quest, Magic Leap and Hololens.
In addition, all the MR devices are controlled by MRTK framework (Mixed Reality Toolkit). You can learn more about MRTK here.
The table below summarizes the different types of controls methods available on other MR devices. Green color refers the operation that are already implemented.

The type of implementation are different depends on the distance from the object to the user. If the object is close to the user, then implementation will be either direct manipulation or bounding box (also referred as bounds controls). If the object is far away from the user, then the implementation will be hand ray.
Regardless of the implementation, the specific operation will always be the same: selection, movement, rotation and zoom. The definition of each operation will be explained in the next section.
The difference between direct manipulation and bounding box is that in direct manipulation, user controls the object directly, while in bounding box, the user controls the box that is surrounding the object instead of the object itself.
The video below demonstrates the effects of direct manipulation (video starts from 0 second to 8 second):
The video below demonstrates the effects of bounds control (video starts from 17 second to 23 second):
The video below demonstrates the effects of hand ray (video starts from 9 second to 16 second):
Implementation progress
This quarter I have implemented direction manipulation and bounding box. Hand ray will be implemented in the future.
Definition of Direct manipulation operations
Before showing the demos of direct manipulation, it is necessary to define each operation.
Selection
This is the most fundamental operation. In order to apply any change to an object, one must first select the object. I will implement my control to the same as MRTK method. In MRTK, a change in the state of object is also visible. In the example below, the button is pressed when selected. This and all the other 3 pictures are taken from the Oculus Documentation.
The left side is the implementation by direct manipulation and the right side is by hand ray.
Movement
This is a very common operation. Usually when we want to apply change to an object, we want to move it around.
Rotation
There are 2 types of rotation. The first type is the shown on the left, rotation by an axis (in this case the hand). The second type is shown on the right, which is rotation at its origin, or spinning.

Zoom
Zoom, or scaling includes both zoom in (making the object bigger) and zoom out (making the object smaller).
In the example in the left, strictly speaking, combines the operation of both zoom and rotation. In the example to the right, it is the standard zoom operation.

Direct manipulation Implementation demos
As I have stated before, direct implementation includes selection, movement, rotation and zoom. All the operations have been implemented using hand gesture.
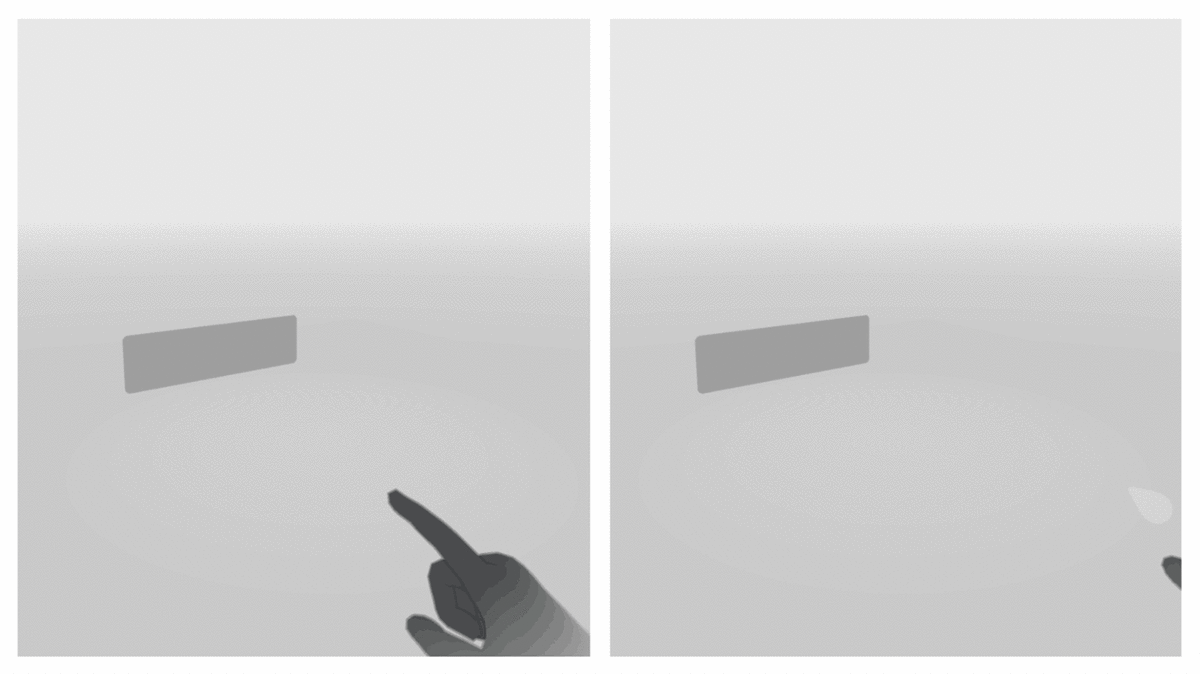
First I present the demo for movement. The first half of the video demonstrates the effect of the drawing using hand gestures. The app tracks index finger position (the tip), and draws lines accordingly. Then to apply operations, I pressed the switch in the UI and it will change from draw mode into transform mode.
When we create the node, the center position is calculated by taking all the averages of the drawing nodes. Therefore, the finger position and the center of the drawing will be at different places. The drawing appears smaller after movement because the camera detects the finger is further away from the screen. The result is the whole object is shifted away from the camera.
The source code for movement and rotation have already been published in the previous blog, therefore I will not publish it here.
Next I would like to present the demo for rotation. First this is the second type of rotation which the object rotates around the origin. This is the same demo video which I have used in my previous blog.
This video shows the first type of rotation. In this video this is the x-axis rotation around the finger position.
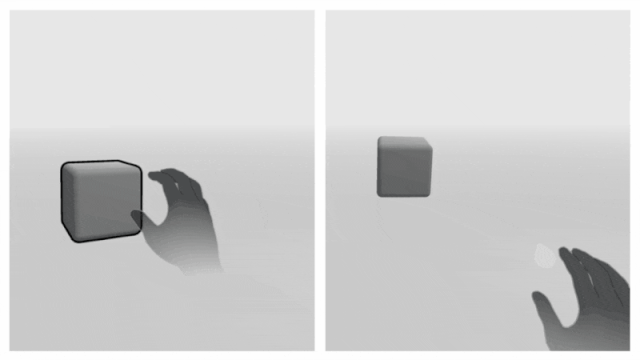
Now I would like to present the demo for selection. I used free 3D model of Pokemon ball which changes color when the finger is inside the ball. The operation is rather simple, so I will not provide the source code for this part.
Finally I would like to present the demo for zoom. I believe the slow speed is due to IOS framework limitation.
This is the source code for zoom. When we use hand gestures, it is not possible to specify how much to zoom in or out. Instead, we can keep increase or decrease the scale of every node until the state (detected hand gesture) changes.
if (self.state=="grab"){
    let action = SCNAction.scale(by: CGFloat(1.02), duration: 0.1)
    for node in sceneView.scene.rootNode.childNodes {
        node.runAction(action)
        for node2 in node.childNodes{
            node2.runAction(action)
        }
    }
    return
    }
if (self.state=="rotate"){
    let action = SCNAction.scale(by: CGFloat(0.98), duration: 0.1)
    for node in sceneView.scene.rootNode.childNodes {
        node.runAction(action)
        for node2 in node.childNodes{
            node2.runAction(action)
        }
    }
}
To summarize, for direction manipulation, all the operations (selection, movement, rotation and zoom) have been implemented by hand gesture in IOS.
Bounding box demos
Why do we need bounding box?
One natural question that the readers might ask is "Why do we need bounding box if we already have direct manipulation?" Indeed both bounding box and the direct manipulation operation have the same effect. However, when using bounding box, there are 2 advantages when using the bounding box instead of direct manipulation.
The first advantage is that it is easier for the user to see the result of the modified object. For example, if the user want to enlarge one object to the same scale to another object, it is much easier to check by using bounding box if the 2 objects overlap. For this reason, bounding box is the default implementation for zooming in MRTK.
The second advantage is that by adding a bounding box, it is much easier to detect the object in the scene. Without bounding box, the hitTest (detecting if the object and the fingers are collided) may fail because the object is too small. By adding the bounding box, the object selection is made much easier.
On the other hand, when the operations are limited to movement and rotation, direct manipulation is simpler to operate.
Creating the bounding box
Creating the bounding box surrounding the object is not as easy as it seems. Swift does contains boundingBox method, but this does not work well for multiple nodes. The resulting bounding box is a box much larger than it should be.
Therefore, I have used my own method to calculate the bounding box. The algorithm is as follows:
- Process all the node in the scene and obtain the maximum and minimum node position
- Calculate the center of the bounding box by taking the midpoint of the maximum and the minimum position.
- From the center calculate the length, width and height.
This is my source code for calculating the bounding box:
let nodes: [SCNNode] = getMyNodes()
var minposition: SCNVector3 = SCNVector3()
var maxpostion: SCNVector3 = SCNVector3()
var node_count = 0

for node in nodes {
    if(sceneView.anchor(for: node)?.name != nil) && (sceneView.anchor(for: node)?.name != "dot"){
        parentNode.addChildNode(node)
        if node_count == 0 {
            minposition = SCNVector3((node.worldPosition.x), (node.worldPosition.y),
                                        (node.worldPosition.z))
            maxpostion = SCNVector3((node.worldPosition.x), (node.worldPosition.y),
                                        (node.worldPosition.z))
        } else{
        minposition = SCNVector3(min(node.worldPosition.x, minposition.x), min(node.worldPosition.y, minposition.y), min(node.worldPosition.z, minposition.z))
        maxpostion = SCNVector3(max(node.worldPosition.x, maxpostion.x), max(node.worldPosition.y, maxpostion.y), max(node.worldPosition.z, maxpostion.z))
        }
        node_count += 1
    }
}
let width = sqrt((minposition.x - maxpostion.x) * (minposition.x - maxpostion.x)) * 1.2
let height = sqrt((minposition.y - maxpostion.y) * (minposition.y - maxpostion.y)) * 1.2
let length = sqrt((minposition.z - maxpostion.z) * (minposition.z - maxpostion.z))
let box = SCNBox(width: CGFloat(width), height: CGFloat(height), length: CGFloat(length), chamferRadius: 0)
let boxNode = SCNNode(geometry: box)
let sm = "float u = _surface.diffuseTexcoord.x; \n" +
    "float v = _surface.diffuseTexcoord.y; \n" +
    "int u100 = int(u * 100); \n" +
    "int v100 = int(v * 100); \n" +
    "if (u100 % 99 == 0 || v100 % 99 == 0) { \n" +
    "  // do nothing \n" +
    "} else { \n" +
    "    discard_fragment(); \n" +
    "} \n"
box.firstMaterial?.diffuse.contents = UIColor.white
box.firstMaterial?.shaderModifiers = [SCNShaderModifierEntryPoint.surface: sm]
box.firstMaterial?.isDoubleSided = true
sm refers to the box material, which is the appearance of the box. The default appearance is a solid fill which will hide the object completely so it is necessary to change the "shadeModifiers".
The demo of box creation will be shown together with movement in the next section.
Bounding box selection
Bounding box selection is similar to the selection in direct manipulation. Therefore I will skip the details.
Bounding box movement
Movement is also similar to movement in direct manipulation. This is my implementation.
guard let touchPositionInFrontOfCamera = getPosition(ofPoint: thumbTip2, atDistanceFromCamera: self.distance, inView: self.sceneView) else { return }
if(self.state == "rotate"){
    node1!.simdPosition = simd_float3(Float(touchPositionInFrontOfCamera.x), Float(touchPositionInFrontOfCamera.y), touchPositionInFrontOfCamera.position.z)
} else if (self.state == "grab"){
}
One property of the ARKit that one may not be familiar everything is organized by node. Every object is a node. Each node can be a child node of another node. The advantage of using a node is that, if the transformation is applied to the parent node, the child node will also undergo the same transformation automatically. We will use this property for all the transformations.
All we need to do is to modify the simdPosition of the node in the scene. The difference between position and simdPosition is simdPosition is better optimized and therefore performs faster than position. position is slower but on the plus side it can support from IOS 8.0 onwards. In contrast, simdPosition can only support from IOS 11.0 onwards. In our use case, we assume the user uses iPhone with Lidar sensor, therefore we will choose simdPosition for faster processing speed. Because in my node structure, the bounding box is added as a child node of the drawing, all we need to do is to modify the simdPosition of the drawing.
In this case, the hand gesture works as to decide when to move the box and when to stop. If we encounter the "stop" ("grab") in the source code, then we will not perform any change at all.
I have posted the effect of movement in the video below. As you can see, sometimes the box does not follow the finger position because hand gesture recognized have failed. There is always a probability that the recognizer may fail. I will investigate how to improve the recognization in the future.
Bounding box rotation
The code for rotation is actually rather simple. There are multiple ways to achieve rotation, we will use the simplest implementation which is changing the Euler angle of each node.
The difference to apply type 1 and type 2 rotation is where we apply the rotation to the node. If we apply the rotation to the child node of the root node, we will get rotation type 2; if we apply the rotation to the root node level, we will get rotation type 1.
First, I will present the source code for rotation type 1.
if (self.state == "rotate"){
    for node in sceneView.scene.rootNode.childNodes{
            node.simdEulerAngles.y += 0.1
    }
}else if (self.state == "grab"){
    for node in sceneView.scene.rootNode.childNodes{
            node.simdEulerAngles.y -= 0.1
    }
}
Now I present the code for rotation type 2.
if (self.state == "rotate"){
    for node in sceneView.scene.rootNode.childNodes{
        for node2 in node.childNodes{
            node2.simdEulerAngles.y += 0.1
        }
    }
}else if (self.state == "grab"){
    for node in sceneView.scene.rootNode.childNodes{
        for node2 in node.childNodes{
            node2.simdEulerAngles.y -= 0.1
        }
    }
}
The video below demonstrates the first type of rotation.
The second video demonstrates the second type of rotation.
Bounding box zoom
Zoom is the most difficult type of operation to implement. There are a number of approaches to this operation. The simplest implementation involves using 2 distinct hand gestures, one for zoom in and one for zoom out. While this approach works, I wanted the control to be more like the MRTK version.
My approach involves calculating the finger position and then calculating the scale that is needed to scale the box. It will change the scale so that the edge of the box will overlap with the finger position.
guard let touchPositionInFrontOfCamera = getPosition(ofPoint: thumbTip2, atDistanceFromCamera: self.distance, inView: self.sceneView) else { return }
let boundary = CGFloat(boundingBox.position.x) + (CGFloat(Float((boundingBox.geometry as? SCNBox)!.width)))/2
let boundary2 = CGFloat(boundingBox.position.y) + (CGFloat(Float((boundingBox.geometry as? SCNBox)!.height)))/2
xscale = Float((CGFloat(touchPositionInFrontOfCamera.x) - CGFloat(boundingBox.position.x)) / boundary)
yscale = Float(abs( CGFloat(touchPositionInFrontOfCamera.y) - CGFloat(boundingBox.position.y)
) / boundary2)

if (self.state == "rotate"){
}else if (self.state == "grab"){
    parentNode.simdScale = simd_float3(abs(xscale), abs(yscale), 1)
}
Discussion
In this blog, I have demonstrated how to control AR objects by direct manipulation and bounding box by using hand gestures. It is clear there are a few issues that are present with controlling by hand gestures when comparing to the controlling in MRTK.
The first issue is that it is considerably slower. This is largely due to the hardware and framework limitations. iPhone does not contain a sensor or a controller, therefore it cannot accurately determine the finger position. We have estimate the hand position using the vision framework which is always be slower than directly obtaining the value from the sensor. I will investigate how to speed up the performance in the future.
The second issue is that the difficulty of recognizing multiple hand gestures. While it is possible to recognize multiple hand gestures, it creates a problem for both the system and the user. For the user, one have to remember multiple hand gestures; and for the system, it is difficult to distinguish them. The more hand gestures that the system has to recognize, the more likely it is likely to fail to classify the hand gesture. Controlling everything with pure hand gestures is difficult and not user friendly. From my experience, the app works the best when there are less than 4 distinct hand gestures. Therefore to fully support selection, movement, rotation and zoom, we need to use the UI controls such as buttons or switches in addition with hand gesture.
The third issue is that the Vision framework does not work well for moving hands. The vision framework works best for still images, however if the hand movement is too rapid, the image recognization will struggle to keep up and results are "delayed" (from a few frames before). Fortunately with the release of IOS 14, apple has added a new method hand action classifier which assumes moving videos. The performance of dynamic hand gesture recognition maybe be improved by use this new hand action classifier.
Future work
With regarding to controlling using hand gestures, I will implement the hand ray for far object control. I will also investigate the ways to speed up the performance. Finally I will replace the current Vision hand recognizer with the new hand action classifier.